Sunday, October 15, 2006

Linux Command To Confirm Bad Sector

Hard disk being one of the vital components in computer system. Unfortunately, hard disk is also being one of the most high risk and sensitive components that is prone to failures, owed to the fact of mechanical subsystem attached!

The Linux command badblocks could be used to run bad sector burn-in test on a new or suspected faulty hard disk. Just get a low end PC or server installed with Linux OS, attach the target hard disk to the IDE or SCSI bus, and run the badblocks command on the target hard disk. For example,

badblocks -svw -t random -p 3 /dev/sdb

get badblocks to perform three rounds of destructive write of random data to the second SCSI hard disk.

Be careful! The option switch -w performs destructive write. Never use this option switch on a partition with filesystem. Instead, use -n to perform non-destructive read-write on a partition with filesystem!

Related information:

  • Search more related info with Google Search engine built-in

Checklist To Tune DB2 Performance

DBA suggests few of the recommended database performance tuning tips for IBM DB2 database engine that is running on Linux server.

  • Linux kernel parameters tuning that applicable to DB2 version 8.1 and 8.2.

    Executing command sysctl -A to print out current kernel parameters setting. Some of the notable are

    • kernel.sem (Semaphore setting)
      Recommended Value : 250 256000 32 1024

    • kernel.msgmni (Maximum system-wide queues)
      Recommended Value : 1024

    • kernel.msgmax (Maximum size of messages in byte)
      Recommended Value : 65536

    • kernel.msgmnb (Default size of queue in byte)
      Recommended Value : 65536

    In order to retain these changes of kernel parameters on every system reboot, add the updated kernel parameters setting to /etc/sysctl.conf system file to do the great job.

  • DB2 database configurable parameters tuning.

    After connecting to database called my_test_db by executing db2 connect to my_test_db, running another DB2 command db2 autoconfigure apply none to get DB2 database engine calculate the best recommended value of DB2 database configurable parameters. Some of the notable are

    • LOGPRIMARY / LOGFILSIZ
      Larger log buffer required for OLTP workloads with high transaction rate.

    • CHNGPGS_THRESH
      For databases with heavy update transaction workloads, make sure there are enough clean pages in the buffer pool by setting the parameter value equal to or less than the best recommended value calculated by DB2 database engine.

    • LOCKLIST
      The amount of storage that is allocated to the lock list. Increase this value if lock escalations causing performance concerns, that logged as warnings in the db2diag.log file.

    • DBHEAP
      Database heap per database. Needs to be increased for larger buffer pools.

    • NUM_IOCLEANERS
      Large buffer pools require a higher number of asynchronous page cleaners.

  • Alternate page cleaning algorithm tuning.

    DB2 UDB ESE v8.2 introduces a new buffer pool page cleaning algorithm which is not turned on by default. It is necessary to test this new page cleaning algorithm with the database workload. To turn on this alternate page cleaning algorithm, executing DB2 command

    db2set DB2_USE_ALTERNATE_PAGE_CLEANING=YES
Related information:
  • Search more related info with Google Search engine built-in

Disable Linux Reboot On CTRL+ALT+DEL

Don't ever press CTRL+ALT+DEL key combination in a Linux server!

Windows guys used to press CTRL+ALT+DEL key combination follow by ENTER key to immediately lock the server running on Windows 2000 or Windows XP and above when they leave the server.

What is the default behaviour when pressing CTRL+ALT+DEL key combination in a Linux machine? Well, the default action of Linux in responding to CTRL+ALT+DEL key combination is to reboot the Linux machine immediately! Just press it once, not twice as in Windows Me, and Linux will not be kind to ask confirmation before it really rebooting itself!

Anyway, this Linux default behaviour in responding to CTRL+ALT+DEL key combination pressed could be tweaked, indeed. Edit the /etc/inittab system file, look for the line containing ctrlaltdel keyword, and then either

  1. Remark the line ca::ctrlaltdel:/sbin/shutdown -t3 -r now to disable Linux from responding to the CTRL+ALT+DEL key combination

               or

  2. Replace the /sbin/shutdown -t3 -r now with something else, such as

    dialog --clear --title "Information" --msgbox "Don't press CTRL+ALT+DEL key combination in Linux machine.\n\nTo reboot server, use init 6 or init 0 to shutdown Linux." 10 40;clear

    which use the dialog box command to alert users with a text-based GUI information dialog box.
Impress Linux users with text-based GUI dialog box control.

Related information:
  • The dialog box command is not a standard program installed by most Linux distribution. Find the dialog package from respective Linux distribution and install it.
  • Search more related info with Google Search engine built-in

Which Command Is Linux Refer

Opss! Executing ls command at keith login account displaying directories in blue color, executable file in green color, and plain text file in white color, etc.

But, when executing the same simple ls command at root login account does not differentiate file type by color scheme. How come?

Users who are familiar with shell built-in command alias will know that it is the alias that wrap the ls command with --color=none option switch. At the command prompt, type

alias | grep ls

will able to tell the fact of this.

The which command is used to find out which command the Linux shell interpreter is referring to in the current login session. The simple form of which command, such as which ls will show the path of the ls command without telling the alias name of it. Well, tweak which command with its command option switch and wrap it with alias command, such as this

alias which='alias | /usr/bin/which --tty-only --read-alias --show-dot --show-tilde'

Execute the which ls again, will now able to show both the ls command path and the alias of it, as shown in the diagram.

using the linux which command and alias command

Related information:

alias Shorten Long Linux Command

Tired of typing Linux command because of long list of command option switches? Try to use the command alias to relieve tired of typing long Linux command then.

As the command name suggests, the Linux shell built-in command alias allows a user-defined command to represent

  1. A system command with long arguments, such as

    find . -type d -print

    This find command used with a long option switches to list all directories that exists from the current directory downwards. The find command could be rather long if more find command option switches applied.

    This long command line could be made simple with an alias, such as

    alias dirfind='find . -type d -print'

    that allows user to execute the short user-defined command dirfind instead of typing out that long command line.

  2. A series of system commands, such as

    tar -zcvpf bin.tgz bin; [ $? -eq 0 ] && echo DONE || echo FAIL

    These system commands execute sequentially, aim to check the tarball archive creation status upon its completion. If success then echo DONE else echo FAIL.

    Again, by using the alias command could make it shorter and simple enough, such as

    alias chkbkp='tar -zcvpf bin.tgz bin; [ $? -eq 0 ] && echo DONE || echo FAIL'

    where the user could execute chkbkp at command prompt and the Linux shell will expanding it to that commands series.
Related information:
  • It is not advisable to declare and use alias in shell scripts. It is better to use a variable or a function for the purpose. Anyway, if insist, it is technically possible to use alias in shell scripts by turning on shell scripts option shopt -s expand_aliases before declaring and using an alias inside the shell scripts, such as the sample in diagram below.

  • Use alias in bash shell scripts with shopt -s expand_aliases enabled

  • By default, the parent shell where a shell scripts executed will always spawn the scripts execution into a subshell, unless explicitly run the shell scripts in the current shell environment. Shell scripts that is running in subshell will not able to use aliases defined in parent shell environment!

    To run a shell scripts in current shell environment instead of spawning into subshell, use one of these two syntax

    source testscripts.sh
                or
    . testscripts.sh

  • How to run shell scripts in subshell. How to run shell scripts in the current shell?

  • In Linux system, there is a file named .bashrc in each home directory. Use this file to define aliases, which will make the defined aliases effective on each login.
  • The login profile .bash_profile could also be used to define aliases. In fact, it is the .bash_profile which execute the .bashrc while a user login.
  • To remove an alias, simply use the shell built-in command unalias, such as unalias chkbkp
  • To list all the aliases defined in the current login session, just type the command alias at the command prompt will do.
  • Which command is the Linux shell refers to
  • Search more related info with Google Search engine built-in

Saturday, October 14, 2006

Booting Thin Client Diskless Workstation

Bootp, shorts for Bootstrap Protocol, is an UDP network protocol which is originally defined in RFC 951 to assign IP address for network clients. Bootp is well suitable to apply in diskless workstation, workstation without operating system installed, or simply called thin client.

Bootp is not DHCP! Although both of these two protocols sound similar at first thought, but they are technically different and could be co-exists in the same server or network segment.

Hospitality management system giant, Micros System Inc, makes good use of bootp in its high rank Point-Of-Sale system called Micros 8700 HMS.

When the diskless Micros PC Workstation power on, the bootp enabled network interface card will broadcast its MAC address to the network. When the bootp daemon running on the Micros host receives the broadcast packets, it will assign a valid IP address follow by transferring a DOS operating system image to the PC Workstation according to the MAC-IP-Image mapping maintained in the bootpd configuration file.

Once the image transferring (via tftp protocol) completed, the diskless PC Workstation starts to boot up with the OS image parking in memory segment that act as RAM-DISK. When the boot up completed, the Micros diskless PC workstation functions as if it is a normal desktop PC pre-installed with DOS OS.
Bootpd server and clients could be reside on different network segment by deploying bootp relay agent. To make thing simple or get it up and running right during initial roll out, put both bootpd server and client on the same network segment.

Checklist when thin client unable getting IP address:

  1. Replace a known good unit of thin client to rule out possibilities of

    • Faulty boot ROM embedded in NIC that is bootp enabled
    • Faulty Ethernet patch cable
    • faulty network access point or LAN point

  2. Bootp daemon is not running. In Linux/Unix, execute

    ps -ef | grep bootpd
                or
    lsof -i | grep 67

    to confirm bootp daemon is running and listening to legacy port number (as shown in /etc/services file)

  3. Incorrect MAC address to IP address mapping maintained in /etc/bootptab bootpd configuration file

  4. ARP cache conflict at bootpd server. Executing the command

    arp -a

    to list the bootpd server arp cache. Confirm that there is no ARP cache conflict. To delete the conflict, for example conflict on IP address 192.168.1.3, execute command

    arp -d 192.168.1.3

  5. Use cross-over patch cable or straight Ethernet cable and a hub to directly link up the bootpd server and client to form an simple isolate network. If it works in this simple network infrastructure, then get network experts sit in for assistant. There might be firewalls or routers that have blocked the UDP packets from reaching to bootpd server.
Related information:
  • Tftp protocol in brief

    • Host A sends an read request (RRQ) or write request (WRQ) packet to host B. The packet containing the filename and transfer mode.
    • Host B replies with an acknowledgement packet (ACK) to WRQ or directly with a DATA packet in case of RRQ. The reply also serves to inform host A of which port on host B the remaining packets should be sent to.
    • The source host sends numbered DATA packets to the destination host, all but the last containing a full-sized block of data. The destination host replies with numbered ACK packets for all DATA packets.
    • The final DATA packet must contain less than a full-sized block of data to signal that it is the last. If the size of the transferred file is an exact multiple of the block-size, the source sends a final DATA packet containing 0 bytes of data.

  • Search more related info with Google Search engine built-in

Wednesday, October 11, 2006

lsof Identify Resource Locked Process

Samba server comes with a handy utility called smbstatus to report users who are holding the shared resources.

Utilities used to find out processes that are locking system resources are among the most wanted system utilities for experienced users and system administrators. The lsof being one of such excellent utility that used to identify process or user that is locking system resource such as file or network socket.

For example, a system administrator could use the lsof -i to easily understand how the IBM MQ server communicate over the TCP/IP network with IBM Informix server. The lsof output, as in the diagram below, shows that the Informix oninit is listening to a user defined mnemonic port name stp which the IBM MQ server communicate with. The /etc/services system files is usually used to map a numeric port number to a descriptive port name defined by user.

The Linux lsof utility used to find out process or user that locks a system resource such as file or network socket

  1. Execute lsof -i TCP to report all processes that are accessing the TCP sockets found on the system

  2. Execute lsof -i tcp:8080 to find out what process is holding TCP port 8080.

  3. Execute lsof without any command options to list system wide resources that are using by processes running in the system.

  4. Execute lsof -p 456 to show all resources that are being held by process id 456

  5. Some programs might running on the Linux system by more than one instance. In this case, type lsof -c ProgramName instead of lsof -p PID to get a broader scope of view. For example, lsof -c squid to find out what are the resources held by all squid processes running on the system.

  6. Execute lsof -u keith to confirm resources that are being held by user id keith

  7. Execute lsof /home/keith/secretfile to find out what are the processes that are locking the specify file /home/keith/secretfile
Related information:
  • Another utility called fuser has similar features as of lsof utility. Executing fuser -m /media/cdrom will report all process id that are holding the specify resource.

    Each of the process id suffix with an ASCII character code which represent the resource access type. These resource access type codes are not standardize among various Linux distributions. To be safe and accurate, always consult the fuser man page to confirm the code definitions.

    To check out what process ID is using TCP port 8080, execute the fuser as fuser -n tcp 8080 or fuser 8080/tcp

  • The native network related Linux command netstat is a good tool to find out what program or command is binding to a TCP and UDP port. For example, there are Bind, Djbdns, etc, used to bind with port 53 for DNS protocol. By executing netstat command as

    netstat -tulap

    will shows both the program and process id that bind to the network port. The diagram below shows the commands output of lsof vs netstat.

    netstat vs lsof

    Both of the commands displaying pseudo port name instead of numeric port number, where the mapping of pseudo port name and numeric port number is defined in /etc/services file.

    The netstat command, however, able to display numeric port and IP address with -n option switch. For example, rewrite the command as netstat -tulapn

    Note! Both netstat -tulap and lsof -i MUST be executed with root user account privileges, else nothing as those in the diagram above will be seen.

  • Search more related info with Google Search engine built-in

Tuesday, October 10, 2006

Restart VNC Remotely

Opsss! Can't VNC over to remote hosts!

Might need to restart the VNC server, but how?

  • Restart Windows-based (Windows 2000 and above) VNC server

    1. Right-click the My Computer icon on Desktop

    2. Click the Manage option from the pop up context menu

    3. Click the Action menu of the Computer Management windows

    4. Click the Connect to another computer... option

    5. Type the IP address or DNS name of the target PC running the VNC server

    6. Enter the login authentication info when prompt

    7. After connect successfully, click the Services and Applications on the left panel.

    8. Click the Services option

    9. Search for VNC Server service on the right panel, right-click on it, and click Restart option to restart the VNC server.

  • Restart Linux-base VNC daemon

    1. Telnet or ssh over to target host that running the VNC daemon

    2. Type the command vncserver -kill:1 to kill the VNC daemon running on DISPLAY:1, for example.

    3. Type vncserver :1 to bring up the VNC daemon running on DISPLAY:1 again.

    4. To ensure VNC daemon startup listening for connection, type

      netstat -ant | grep 5901

      where 5901 is the legacy VNC daemon listening port of DISPLAY:1 in the previous step. If the port is open and listening means that VNC daemon is up and running successfully.
Related information:

MD5 Shell Scripts Find Duplicate Files

The shell scripts wrap the default md5sum program found on most Linux system to prepare a report of unique and duplicate files in a given directory.

The lengthy source code could be shorten if removing the DupUniRpt function which merely used to prepare an easy to read report that showing both the filename and number of duplicate and unique files.

By removing the DupUniRpt function call and function coding, do remember to add the line

cat $FM5L

right after the DupUniRpt function call in the if-else statement. The $FM5L is a semi-raw report file that groups duplicate and unique files together.

The wDupUniRpt.sh contain the same source code of DupUniRpt function source code, which could be used to prepare that easy to read report based on the semi-raw report file. This shell scripts created merely for easy debugging purpose.

Both these shell scripts have been tested successfully with as much as possible scenarios. The source code might be able to further enhanced for efficiency or bugs fixing if any. Any suggestive comments are greatly appreciated.

Related information:

  • wmd5.sh to report both filename and number of duplicate and unique files in a given directory
  • wDupUniRpt.sh used to report redundant and unique records in an ASCII file of sorted records.
  • MD5 checksum used to find redundant files
  • Search more related info with Google Search engine built-in
Monday, October 09, 2006

Using ls Command By Examples

The ls command is a Linux command that is used to list directory contents. In fact, it is a standard shell command that exists in all Unix/Linux variants.

Using ls command by examples

  • To list all files in ascending order of file name detailed with file modification time

    ls -la

  • To list all files in descending order of file creation time in full or customized date-time format

    ls -lact --full-time
    ls -lact --time-style="+%d %m %Y"

  • To list all files in descending order of file creation time

    ls -lact

  • To list all files in descending order of file size in kilobytes

    ls -laSh

  • To list only directories

    ls -ap | grep /
              or
    ls -al | grep ^d

    Alternatively, use the find command as

    find . -type d -print

  • To list only directories initial with rpt filename

    ls -al rpt* | grep :$
              or
    find . -type d -name "rpt*" -print

Definition of ls file listing command option switch
  • option switch l used to list files in long listing detailed format.

  • option switch a used to list all files including hidden files which filename prefix with a dot.

  • option switch lct used together to list file in descending order of file creation time.

    option switch lc list file creation time and sorted by filename.

    option switch lt list file in descending order of file modification time.

  • option switch h used to list files size information in kilobytes (KB).

  • option switch S used to list files in descending order of file size in byte.

  • option switch r used to reverse the default of descending listing order to ascending listing order.

  • option switch --full-time or --time-style used to display time-related info in full or customized format.


Notes! If the ls command colour scheme is not easy to read, turn it off by either:
  • On ad-hoc basis by adding option switch. For example

    ls /etc --color=none

    to list /etc directory contents without color scheme turning on. OR

  • On selective login session only. Use the alias command to save typing efforts. For example, execute the command

    alias ls="ls --color=none"

    will cause subsequent ls command executing as if it is supplied with --color=none option switch and automatically turn off the color scheme.

  • On each login session of individual login acount only. Copy the file /etc/DIR_COLORS to the user home directory as $HOME/.dir_colors and edit the variable COLOR to become COLOR=none to do the job.

    From the next user login onwards, type the command set | grep COLOR will notice that the COLORS variable changed as specified in the $HOME/.dir_colors setting file. Typing the ls command as usual which will disable the file listing color scheme automatically.

    To turn on the color scheme again, simply rewrite the line COLOR=none to COLOR=tty or COLOR=auto will do.

    The file /etc/DIR_COLORS is used to control file listing color scheme globally, meaning that all users account will be affected.
Related information:

Tuesday, October 03, 2006

File Command Guess Linux File Type

By convention, Windows system using 3 alphanumeric characters to serve as file extension. File extension telling Windows OS how to deal with the file, what program to manipulate the file, and to Windows users easily recognize a common file type.

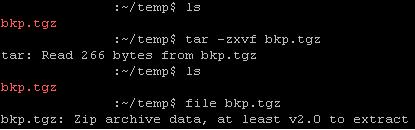
There is no such strong concept of file extension in Linux as well as UNIX world. Linux folks, however, do practice to use file extension for some file formats such as compression or archive file format. Windows users might easily get cheated by file extension trap in Linux.

For example, it is perfectly fine to rename a PKZIP compatible zip file called backup.zip to backup.tgz or whatever filename. Later, if the user simply executing tar -zxvf backup.tgz might either get errors or see nothing and thought the file is corrupted.

Purposely rename a PKZIP compatible zip file as it is a gzip compressed tarball archive file. Use the file command to test the file if it is a valid Linux file format.

Wait! Before deleting the file which thought to be corrupted, use the file command to inspect the file type first.

Type file backup.tgz at the command prompt, it shows that backup.tgz is actually a PKZIP compatible zip file. So, user should executing unzip backup.tgz to extract the zip file or rename backup.tgz to backup.zip before executing the unzip command.

Related information:

  • Search more related info with Google Search engine built-in

Tuesday, September 26, 2006

Understand And Configure Linux Printer System

Starting Redhat 7.3, Redhat Linux support two type of printing system known. These two subsystem are known as LPRng and CUPS respectively.

  1. LPRng printing system, Redhat default printer subsystem, provides printconf as printer manager utility to configure /etc/printcap configuration file, printer spooler, etc.

    While at command prompt, executing printconf-tui (Redhat 7.3) or redhat-config-printer-tui (Redhat 8.0) to bring up command line version of LPRng printing manager.

    For the graphical version, click on the Main Menu => System Settings => Printing or type redhat-config-printer or printconf-gui at a XTerm or Gnome terminal shell prompt to bring up the same GUI program.

  2. CUPS, shorts for Common UNIX Printing System, is an Internet Printing Protocol-compliant system for UNIX and Linux. CUPS printer subsystem uses the printer manager utility called lpadmin to configure /etc/printcap configuration file, printer spooler, etc. If CUPS is not the default printer subsystem, launch the Printer System Switcher application by executing the command redhat-switch-printer and set CUPS as the new default printer subsystem.

    To allow only a few selected users to use a printer called inkjet-graphic, execute the command lpadmin -p inkjet-graphic -u allow:keith,jazz,alice and these setting will be updated to /etc/cups/printers.conf configuration file.
Note! The printer manager utility, printconf or lpadmin, saves any printer configurations made to the /etc/printcap setting file. If there is a need to make any printer configurations outside the printer manager utility, add them to the /etc/printcap.local file. The /etc/printcap file will be deleted whenever the printer manager executing or a server reboot.
Steps to add new printer is almost the same among printer manager utilities. In brief, these are the key points to get it works:
  1. Give a descriptive queue name to distinguish the new printer with other printers or network resources, such as keith_laser, boss_laser, tenfloor_inkjet, etc.
  2. Choose the appropriate printer queue type, such as LOCAL queue type for local physical attached printer, JETDIRECT for jetdirect printer, etc.
  3. If there is option to select the Printer Device, rescan the devices for the correct device, or create a custom device. This will be the /dev entry that represents the interface between the device driver and the printer itself. In most instances, the device will be named /dev/lp0.
  4. Choose a Printer Driver by selecting one from the extensive list. Drivers marked with an asterisk (*) are recommended drivers. If to configure remote printer or printer that does not have a corresponding driver in the list, the safest choice would be Postscript Printer. For JetDirect printers, Raw Print Queue is recommended.
To enable local printer sharing for remote host:
  1. In local host which the printer attached, edit the /etc/lpd.perms configuration file to add in one line that will read ACCEPT SERVICE=X REMOTEHOST=</etc/host.lpd and make sure it should added before the line containing REJECT SERVICE=X NOT SERVER.
  2. In the local host as well, edit the /etc/host.lpd printer access control file add in the full qualify DNS host name or IP address, one record per line, of hosts that are allowed to share the printer attached.
  3. At the remote host, add the network printer as adding local printer except one has to choose a Unix Printer queue type and type the print server hostname and port (usually 631).
Related information:
  1. LinuxPrinting.org is a database of documents about printing, along with a database of nearly 1000 printers compatible with Linux printing facilities.
  2. Linux printing how-to from the Linux Documentation Project.
  3. Search more related info with Google Search engine built-in

Monday, September 25, 2006

Redhat Enterprise Linux System File Permission

Redhat Enterprise Linux device file permission could not be changed simply by using the chmod command. Instead, the device file permission is set by udev hotplug subsystem which is included in almost every 2.6 kernel based Linux distribution that is shipping.

The configuration file /etc/udev/permissions.d/50-udev.permissions defines the permission of each devices present in the Linux system. For example,

  • To change the raw devices file permission, search for the line that read as raw/*:root:disk:0660
  • To change tape drive file permission, search for the line that read as st*:root:disk:0660
The default permission defined is 0660. Simply change the 4 digits code as usual to an expected permission, say 0666 instead of 0660.

Related information:
  • Search more related info with Google Search engine built-in

System And Network Monitoring Freeware

Nagios is the answer!

Nagios is the a GNU GPL software that could used to monitor diverse servers and networking devices. Although the Nagios server running only in Linux and UNIX variants there are Windows based Nagios client that could used to monitor Windows server as well.
It is licensed under the terms of the GNU General Public License Version 2 as published by the Free Software Foundation.

Nagios is a powerful system and network monitoring application. It monitors hosts and services specified, alerting administrators when threshold triggered, and when they recover to healthy state.

Nagios is only available in Linux or UNIX variants. Although, it could helps to monitor Windows servers as well via the Windows version of Nagios client.

Nagios features:

  1. Monitors network services such as SMTP, POP3, HTTP, NNTP, PING, etc.
  2. Monitors server resources such as processor load, disk usage, etc.
  3. Simple plugin design that allows users to easily customize own service checks.
  4. Parallelized service checks.
  5. Ability to define network devices hierarchy using "parent" hosts, allowing detection of and distinction between network devices that are down and those that are unreachable.
  6. Notifications to contacts of email, pager, or user-defined method, when service or host status change.
  7. Ability to define event handlers to be run during service or host events for proactive problem resolution.
  8. Automatic log file rotation.
  9. Support for implementing redundant monitoring hosts.
  10. Optional web interface for viewing current network status, notification and problem history, log file, etc.
Related information:

Friday, September 22, 2006

Shell Scripts Monitoring Disk Space Utilization

Nothing special. Just a simple shell scripts, could be served as an introduction of Unix Shell scripts programming, written to check disk space utilization of Linux (applicable to Unix too) filesystems or partitions.

Note! Ignore the left most numeric digits which are not part of the Shell scripts coding. These are line number indicators, which could be turned on in Vi editor using the :set nu command code.

It might be useful to comment out line 14th and remove the hash key on line 15th, which disable echo alert to console and enable alerts emailed to mail box. Configure Linux scheduler via the crontab -e to run this shell scripts, perhaps once a day, and get system administrators alarmed of critical free disk space before the system comes to halt.

Related information:

Tuesday, September 19, 2006

Fine Tuning Nagios Performance

Fine tuning Nagios for optimum performanceThese optimization tips are suggested by Nagios official documentation. It might be useful to fine tune Nagios for optimum performance and effective monitoring service.

  1. Enabling aggregated status updates with the aggregate_status_updates option to greatly reduce the load on the monitoring host especially when monitoring a large number of services. The downside of this approach is getting delay notification on status change.

  2. If standard status log is used instead of aggregated status updates, consider putting the directory where the status log is stored on a ramdisk. Ramdisk helps to speed thing up by saving a lot of interrupts and disk thrashing.

  3. Use max_concurrent_checks option to restrict the number of maximum concurrently executing service checks. Nagios is overloaded if the extinfo CGI showing high latency values, say more than 10 seconds, for the majority of service checks.

  4. The overhead needed to process the results of passive service checks is much lower than that of normal active checks. Passive service checks are only really useful if there are some external applications doing some type of monitoring.

  5. Compiled plugin (C/C++) runs more efficient and faster than interpreted script (Perl, etc) plugins. If really want to use Perl plugins, consider compiling them into true executable using perlcc utility which is part of the standard Perl distribution or compiling Nagios with an embedded Perl interpreter.

    In order to compile in the embedded Perl interpreter, set the --enable-embedded-perl option in the configuration script before compiling Nagios. In addition, use the --with-perlcache option to enable embedded interpreter caching the compiled Perl scripts for later reuse.

  6. The check_ping plugin used to check host states will performs much faster if break up the checks. This is due to the fact that Nagios judges the status of a host after executing the plugin once.

    Hence, it would be much faster to set the max_attempts value to 10 and only send out 1 ICMP packet each time, instead of specifying a max_attempts value of 1 in the host definition and having the check_ping plugin send 10 ICMP packets to the host.

    However, the pitfalls of this arrangement will happens when the hosts are slow to respond may be assumed to be down. Another option would be to use a faster plugin check_fping as the host_check_command instead of check_ping.

  7. Do not schedule regular checks of hosts unless absolutely necessary. Set the value to 0 for check_interval directive in the host definition to disable regular checks of a host. Use a longer check interval if really need to have regularly scheduled host checks.

  8. Disable the use_aggressive_host_checking option to speed up host checks. The trade off is that host recoveries can be missed under certain circumstances.

  9. Set the command_check_interval variable to -1 if running a lot of external commands, i.e passive checks in a distributed setup, will cause Nagios to check for external commands as often as possible. This is important because most systems have small pipe buffer sizes (4KB). If Nagios doesn't read the data from the pipe fast enough, applications that write to the external command file (the NSCA daemon) will block and wait until there is enough free space in the pipe to write their data.

  10. System configuration / hardware setup directly affecting how the operating system (and Nagios application) performs. CPU and memory speed are obviously factors that affect system performance, but disk access is biggest bottleneck. Don't store plugins, status log, etc on slow storage medium such as old IDE drives or NFS mounts. Always opt to use UltraSCSI drives or fast IDE drives whenever possible.

    Note! Many Linux installations do not attempt to optimize IDE disk access. Use hdparam to change the IDE hard disk access parameters to gain speedy features of the new IDE drives.

Sunday, September 17, 2006

Compare And Find Best Compression Format

Compression ratio depends on data and algorithm used for compression. Compression speed counts on CPU power and data compression algorithm in used. Some compression utilities such as 7za, gzip, bzip2, etc, come with options to set level of compression. Setting to higher level of compression will means more time taking to compress and decompress too!

Follow the links below to the comparison of various file compression formats. Find the best compression scheme that suit better for a particular application.

  • Lzop official site
  • Rzip official site
  • 7za / 7-Zip / LZMA related article
  • Maximum Compression benchmark
  • Practical compressor test benchmark
  • Ultimate command line compressor benchmark
  • Linux compression tools benchmark. Find the balance between level of compression ratio and time require to complete the compression process.
  • Excerpt from the source:

    lzop is the fastest tool. It finishes about three times faster than gzip but still compresses data almost as much. It finishes about a hundred times faster than lzma and 7za.

    Get even higher compression ratios by combining lzma with tar to increase storage space effectively by 400%.

    The data compression tool with the best trade-off between speed and compression ratio is rzip. With compression level 0, rzip finishes about 400% faster than gzip and compacts data 70% more. Rzip default compression level is another top performer too as it can increase effective disk space by 375% but in only about a fifth of the time lzma can take.

    Rzip accomplishes this feat by using more working memory. Whereas gzip uses only 32KB of working memory during compression, rzip can use up to 900MB! But that's okay since memory is getting cheaper and cheaper.

Thursday, September 14, 2006

7-Zip Better File Archiver Freeware

7-Zip is a full function file archiver freeware!

7-Zip default to compress files in .7z compression format using LZMA compression algorithm.

LZMA, shorts for Lempel-Ziv-Markov chain-Algorithm, is a data compression algorithm developed on 2001. It uses a dictionary compression scheme similar to LZ77 (such as Gnuzip - better known as gzip in Linux world) but features with
  • high compression ratio
  • variable dictionary size up to 4GB
  • compressing speed at about 1MB/s and decompressing speed at about 10-20MB/s on 2GHz CPU
  • little memory require for decompressing depends on dictionary size
  • small code size for decompressing at about 5KB
  • supporting multi-threading and Intel Pentium 4 HT technology
Besides supporting 7z compression format, 7-Zip too able to compress and decompress some other popular compression formats.
  • Supported compression file formats:
    7Z, ZIP, GZIP, BZIP2 and TAR
  • Unzip compressed file formats:
    7Z, ZIP, GZIP, BZIP2, TAR, RAR, CAB, ISO, ARJ, LZH, CHM, Z, CPIO, RPM, DEB, and NSIS
While the classic Winzip, WinRAR, PowerArchiver, etc discontinue as true freeware, 7-Zip becomes better alternative freeware of file archiver as it is distributed under the GNU LGPL, with exception for the RAR plugin.

Others attractive features of 7-Zip such as:
  • Supports files size up to 16000000000GB
  • Unicode file name
  • Self-extracting capability for 7z format
  • Integration with Windows Shell
  • Ability of using any compression, conversion or encryption method
  • Multilingual interface up to 63 languages at time of writing.
  • Available in various platforms such as both Windows 32-bit and 64-bit version, Unix, FreeBSD, Redhat, Fedore Core, Debian, Gentoo, Mac OS X, BeOS etc

Wednesday, September 13, 2006

Find And Remove Duplicate File

When the hard disk space going larger and larger, more files are storing into it. Over the time, there might be a lot of duplicate files scatter around the file system.

As bulk of these redundant files are here and there, redundant files mess up file system, decrease system performance, wasting valuable disk spaces, and ineffective file backup. It takes time and could be a really tedious job to find and delete these redundant files when low disk space alarmed!

MD5 checksum could be a good candidate to find duplicate and redundant files! It could be used to precisely identify which files have updated since last backup done by comparing the MD5 checksum of files between source and target of the backup.

MD5 short for Message-Digest algorithm 5, is a widely-used cryptographic hash function with a 128-bit hash value. MD5 has been employed in a wide variety of security applications used to check the integrity of data stream, TCP/IP packets, files, etc.
Related information:

  • MD5Sums is a tiny Windows command line freeware that able to automatically generate MD5 checksum for all files in a directory except sub directories. Technically, a Windows shell scripts such as VBScripts could be written to programmatic find duplicate files that reside in the file system by calling this tiny freeware via Run method of WshShell object.
  • MD5 unofficial homepage to find implementations in various programming languages.
  • MD5 shell scripts to find unique and redundant files in given directory
  • Search more related info with Google Search engine built-in

Sunday, September 10, 2006

Using VNC And Redhat Linux

VNC shorts for Virtual Network Computing which is based on Remote Frame Buffer (RFB) protocol. VNC enable any VNC compatible clients running on any platform to access remotely, in graphical mode, to any VNC compatible server running on any platform!

For example, a VNC client running on Windows XP able to remote access to the Redhat Linux X windows via VNC daemon running on Redhat Linux, or the Redhat Linux VNC client able to access to Windows XP and run the Windows program in Windows XP via the VNC session.

The term daemon is normally refers to Linux/Unix-based server application/process. So as here. And the term "server" is then refers to a Windows-based server application/process.
VNC provides not only GUI remote access but also persistent desktop where the long running program or unfinished editing works could be kept running while VNC session is closed. User could reconnect back later at some other places and straight away continue to work on the incomplete tasks.

However, there is a different in handling convention VNC session between Linux to Windows and Windows to Linux. When access from Linux VNC client to Windows VNC server, the screen seen in Linux VNC client is the same as one see in front of the real physical GUI console. When a Windows VNC client connects to Linux VNC daemon such as VNC Server, the screen seen in Windows VNC client is different from the real physical GUI console. This happens because the Linux X windows use the default :0 display (X server screen number) on startup and the port is not sharable with other sessions. The work around is by using x11vnc or the Redhat bundled Vino as VNC daemon.

Vino allow legacy VNC client access directly to the :0 display. For example, Redhat Enterprise Linux ES 4 comes with vino RPM package. Once installed, the Vino is called Remote Desktop and normally grouped under Preference menu. Its simple GUI configuration make it easier to startup the Vino's VNC daemon!

VNC Server is bundled with all Redhat Linux distribution. Once installed, start the VNC Server by typing vncserver at command prompt. The vncserver command, is actually a shell scripts file, bring up the first VNC Server daemon listening to TCP port 5801 & 5901 by default. To bring up second VNC Server daemon, specify a port number other than the default. For example, type vncserver :2 to bring second daemon listening to TCP port 5802 & 5902. Port number starting from 5801 is meant for Java-enabled web browser connection, while port number starting from 5901 is meant for legacy VNC client connection. Although VNC Server could not directly connecting to :0 display by default as Vino or x11vnc do, this feature could be enabled by using VNC loadable module for the X Window system or upgrade to VNC Server version 4.x.

x11vnc works like Vino but has much more features bundled such as built-in SSL encryption/authentication, file transfer, etc. x11vnc is written in plain C language and uses only standard libraries. So, there is no compatibility and performance issues by using x11vnc as VNC daemon, indeed!

Connecting from VNC client of any platform to Windows VNC server is quite straightforward. Just type the IP address of the Windows VNC server in VNC client will do. However, a combination of IP address and display port is used to connecting VNC client of any platform to Linux VNC daemon. The display port number is taken from the last 2 digits of Linux VNC daemon listening port number (ignore leading zero if any). For example, type http://10.170.46.111:5801 at any Java-enable web browser in order to connect to a Linux VNC daemon that listening to port 5801 or type 10.170.46.8:1 at any legacy VNC client in order to connect to Linux VNC daemon listening to port 5901.

Related information: