Sunday, October 15, 2006

Disable Linux Reboot On CTRL+ALT+DEL

Don't ever press CTRL+ALT+DEL key combination in a Linux server!

Windows guys used to press CTRL+ALT+DEL key combination follow by ENTER key to immediately lock the server running on Windows 2000 or Windows XP and above when they leave the server.

What is the default behaviour when pressing CTRL+ALT+DEL key combination in a Linux machine? Well, the default action of Linux in responding to CTRL+ALT+DEL key combination is to reboot the Linux machine immediately! Just press it once, not twice as in Windows Me, and Linux will not be kind to ask confirmation before it really rebooting itself!

Anyway, this Linux default behaviour in responding to CTRL+ALT+DEL key combination pressed could be tweaked, indeed. Edit the /etc/inittab system file, look for the line containing ctrlaltdel keyword, and then either

  1. Remark the line ca::ctrlaltdel:/sbin/shutdown -t3 -r now to disable Linux from responding to the CTRL+ALT+DEL key combination

               or

  2. Replace the /sbin/shutdown -t3 -r now with something else, such as

    dialog --clear --title "Information" --msgbox "Don't press CTRL+ALT+DEL key combination in Linux machine.\n\nTo reboot server, use init 6 or init 0 to shutdown Linux." 10 40;clear

    which use the dialog box command to alert users with a text-based GUI information dialog box.
Impress Linux users with text-based GUI dialog box control.

Related information:
  • The dialog box command is not a standard program installed by most Linux distribution. Find the dialog package from respective Linux distribution and install it.
  • Search more related info with Google Search engine built-in

Which Command Is Linux Refer

Opss! Executing ls command at keith login account displaying directories in blue color, executable file in green color, and plain text file in white color, etc.

But, when executing the same simple ls command at root login account does not differentiate file type by color scheme. How come?

Users who are familiar with shell built-in command alias will know that it is the alias that wrap the ls command with --color=none option switch. At the command prompt, type

alias | grep ls

will able to tell the fact of this.

The which command is used to find out which command the Linux shell interpreter is referring to in the current login session. The simple form of which command, such as which ls will show the path of the ls command without telling the alias name of it. Well, tweak which command with its command option switch and wrap it with alias command, such as this

alias which='alias | /usr/bin/which --tty-only --read-alias --show-dot --show-tilde'

Execute the which ls again, will now able to show both the ls command path and the alias of it, as shown in the diagram.

using the linux which command and alias command

Related information:

alias Shorten Long Linux Command

Tired of typing Linux command because of long list of command option switches? Try to use the command alias to relieve tired of typing long Linux command then.

As the command name suggests, the Linux shell built-in command alias allows a user-defined command to represent

  1. A system command with long arguments, such as

    find . -type d -print

    This find command used with a long option switches to list all directories that exists from the current directory downwards. The find command could be rather long if more find command option switches applied.

    This long command line could be made simple with an alias, such as

    alias dirfind='find . -type d -print'

    that allows user to execute the short user-defined command dirfind instead of typing out that long command line.

  2. A series of system commands, such as

    tar -zcvpf bin.tgz bin; [ $? -eq 0 ] && echo DONE || echo FAIL

    These system commands execute sequentially, aim to check the tarball archive creation status upon its completion. If success then echo DONE else echo FAIL.

    Again, by using the alias command could make it shorter and simple enough, such as

    alias chkbkp='tar -zcvpf bin.tgz bin; [ $? -eq 0 ] && echo DONE || echo FAIL'

    where the user could execute chkbkp at command prompt and the Linux shell will expanding it to that commands series.
Related information:
  • It is not advisable to declare and use alias in shell scripts. It is better to use a variable or a function for the purpose. Anyway, if insist, it is technically possible to use alias in shell scripts by turning on shell scripts option shopt -s expand_aliases before declaring and using an alias inside the shell scripts, such as the sample in diagram below.

  • Use alias in bash shell scripts with shopt -s expand_aliases enabled

  • By default, the parent shell where a shell scripts executed will always spawn the scripts execution into a subshell, unless explicitly run the shell scripts in the current shell environment. Shell scripts that is running in subshell will not able to use aliases defined in parent shell environment!

    To run a shell scripts in current shell environment instead of spawning into subshell, use one of these two syntax

    source testscripts.sh
                or
    . testscripts.sh

  • How to run shell scripts in subshell. How to run shell scripts in the current shell?

  • In Linux system, there is a file named .bashrc in each home directory. Use this file to define aliases, which will make the defined aliases effective on each login.
  • The login profile .bash_profile could also be used to define aliases. In fact, it is the .bash_profile which execute the .bashrc while a user login.
  • To remove an alias, simply use the shell built-in command unalias, such as unalias chkbkp
  • To list all the aliases defined in the current login session, just type the command alias at the command prompt will do.
  • Which command is the Linux shell refers to
  • Search more related info with Google Search engine built-in

Wednesday, October 11, 2006

lsof Identify Resource Locked Process

Samba server comes with a handy utility called smbstatus to report users who are holding the shared resources.

Utilities used to find out processes that are locking system resources are among the most wanted system utilities for experienced users and system administrators. The lsof being one of such excellent utility that used to identify process or user that is locking system resource such as file or network socket.

For example, a system administrator could use the lsof -i to easily understand how the IBM MQ server communicate over the TCP/IP network with IBM Informix server. The lsof output, as in the diagram below, shows that the Informix oninit is listening to a user defined mnemonic port name stp which the IBM MQ server communicate with. The /etc/services system files is usually used to map a numeric port number to a descriptive port name defined by user.

The Linux lsof utility used to find out process or user that locks a system resource such as file or network socket

  1. Execute lsof -i TCP to report all processes that are accessing the TCP sockets found on the system

  2. Execute lsof -i tcp:8080 to find out what process is holding TCP port 8080.

  3. Execute lsof without any command options to list system wide resources that are using by processes running in the system.

  4. Execute lsof -p 456 to show all resources that are being held by process id 456

  5. Some programs might running on the Linux system by more than one instance. In this case, type lsof -c ProgramName instead of lsof -p PID to get a broader scope of view. For example, lsof -c squid to find out what are the resources held by all squid processes running on the system.

  6. Execute lsof -u keith to confirm resources that are being held by user id keith

  7. Execute lsof /home/keith/secretfile to find out what are the processes that are locking the specify file /home/keith/secretfile
Related information:
  • Another utility called fuser has similar features as of lsof utility. Executing fuser -m /media/cdrom will report all process id that are holding the specify resource.

    Each of the process id suffix with an ASCII character code which represent the resource access type. These resource access type codes are not standardize among various Linux distributions. To be safe and accurate, always consult the fuser man page to confirm the code definitions.

    To check out what process ID is using TCP port 8080, execute the fuser as fuser -n tcp 8080 or fuser 8080/tcp

  • The native network related Linux command netstat is a good tool to find out what program or command is binding to a TCP and UDP port. For example, there are Bind, Djbdns, etc, used to bind with port 53 for DNS protocol. By executing netstat command as

    netstat -tulap

    will shows both the program and process id that bind to the network port. The diagram below shows the commands output of lsof vs netstat.

    netstat vs lsof

    Both of the commands displaying pseudo port name instead of numeric port number, where the mapping of pseudo port name and numeric port number is defined in /etc/services file.

    The netstat command, however, able to display numeric port and IP address with -n option switch. For example, rewrite the command as netstat -tulapn

    Note! Both netstat -tulap and lsof -i MUST be executed with root user account privileges, else nothing as those in the diagram above will be seen.

  • Search more related info with Google Search engine built-in

Tuesday, October 10, 2006

MD5 Shell Scripts Find Duplicate Files

The shell scripts wrap the default md5sum program found on most Linux system to prepare a report of unique and duplicate files in a given directory.

The lengthy source code could be shorten if removing the DupUniRpt function which merely used to prepare an easy to read report that showing both the filename and number of duplicate and unique files.

By removing the DupUniRpt function call and function coding, do remember to add the line

cat $FM5L

right after the DupUniRpt function call in the if-else statement. The $FM5L is a semi-raw report file that groups duplicate and unique files together.

The wDupUniRpt.sh contain the same source code of DupUniRpt function source code, which could be used to prepare that easy to read report based on the semi-raw report file. This shell scripts created merely for easy debugging purpose.

Both these shell scripts have been tested successfully with as much as possible scenarios. The source code might be able to further enhanced for efficiency or bugs fixing if any. Any suggestive comments are greatly appreciated.

Related information:

  • wmd5.sh to report both filename and number of duplicate and unique files in a given directory
  • wDupUniRpt.sh used to report redundant and unique records in an ASCII file of sorted records.
  • MD5 checksum used to find redundant files
  • Search more related info with Google Search engine built-in

Monday, October 09, 2006

Using ls Command By Examples

The ls command is a Linux command that is used to list directory contents. In fact, it is a standard shell command that exists in all Unix/Linux variants.

Using ls command by examples

  • To list all files in ascending order of file name detailed with file modification time

    ls -la

  • To list all files in descending order of file creation time in full or customized date-time format

    ls -lact --full-time
    ls -lact --time-style="+%d %m %Y"

  • To list all files in descending order of file creation time

    ls -lact

  • To list all files in descending order of file size in kilobytes

    ls -laSh

  • To list only directories

    ls -ap | grep /
              or
    ls -al | grep ^d

    Alternatively, use the find command as

    find . -type d -print

  • To list only directories initial with rpt filename

    ls -al rpt* | grep :$
              or
    find . -type d -name "rpt*" -print

Definition of ls file listing command option switch
  • option switch l used to list files in long listing detailed format.

  • option switch a used to list all files including hidden files which filename prefix with a dot.

  • option switch lct used together to list file in descending order of file creation time.

    option switch lc list file creation time and sorted by filename.

    option switch lt list file in descending order of file modification time.

  • option switch h used to list files size information in kilobytes (KB).

  • option switch S used to list files in descending order of file size in byte.

  • option switch r used to reverse the default of descending listing order to ascending listing order.

  • option switch --full-time or --time-style used to display time-related info in full or customized format.


Notes! If the ls command colour scheme is not easy to read, turn it off by either:
  • On ad-hoc basis by adding option switch. For example

    ls /etc --color=none

    to list /etc directory contents without color scheme turning on. OR

  • On selective login session only. Use the alias command to save typing efforts. For example, execute the command

    alias ls="ls --color=none"

    will cause subsequent ls command executing as if it is supplied with --color=none option switch and automatically turn off the color scheme.

  • On each login session of individual login acount only. Copy the file /etc/DIR_COLORS to the user home directory as $HOME/.dir_colors and edit the variable COLOR to become COLOR=none to do the job.

    From the next user login onwards, type the command set | grep COLOR will notice that the COLORS variable changed as specified in the $HOME/.dir_colors setting file. Typing the ls command as usual which will disable the file listing color scheme automatically.

    To turn on the color scheme again, simply rewrite the line COLOR=none to COLOR=tty or COLOR=auto will do.

    The file /etc/DIR_COLORS is used to control file listing color scheme globally, meaning that all users account will be affected.
Related information:

Tuesday, October 03, 2006

File Command Guess Linux File Type

By convention, Windows system using 3 alphanumeric characters to serve as file extension. File extension telling Windows OS how to deal with the file, what program to manipulate the file, and to Windows users easily recognize a common file type.

There is no such strong concept of file extension in Linux as well as UNIX world. Linux folks, however, do practice to use file extension for some file formats such as compression or archive file format. Windows users might easily get cheated by file extension trap in Linux.

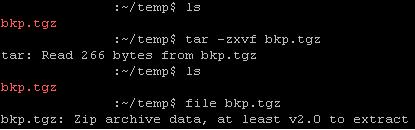
For example, it is perfectly fine to rename a PKZIP compatible zip file called backup.zip to backup.tgz or whatever filename. Later, if the user simply executing tar -zxvf backup.tgz might either get errors or see nothing and thought the file is corrupted.

Purposely rename a PKZIP compatible zip file as it is a gzip compressed tarball archive file. Use the file command to test the file if it is a valid Linux file format.

Wait! Before deleting the file which thought to be corrupted, use the file command to inspect the file type first.

Type file backup.tgz at the command prompt, it shows that backup.tgz is actually a PKZIP compatible zip file. So, user should executing unzip backup.tgz to extract the zip file or rename backup.tgz to backup.zip before executing the unzip command.

Related information:

  • Search more related info with Google Search engine built-in

Monday, September 25, 2006

System And Network Monitoring Freeware

Nagios is the answer!

Nagios is the a GNU GPL software that could used to monitor diverse servers and networking devices. Although the Nagios server running only in Linux and UNIX variants there are Windows based Nagios client that could used to monitor Windows server as well.
It is licensed under the terms of the GNU General Public License Version 2 as published by the Free Software Foundation.

Nagios is a powerful system and network monitoring application. It monitors hosts and services specified, alerting administrators when threshold triggered, and when they recover to healthy state.

Nagios is only available in Linux or UNIX variants. Although, it could helps to monitor Windows servers as well via the Windows version of Nagios client.

Nagios features:

  1. Monitors network services such as SMTP, POP3, HTTP, NNTP, PING, etc.
  2. Monitors server resources such as processor load, disk usage, etc.
  3. Simple plugin design that allows users to easily customize own service checks.
  4. Parallelized service checks.
  5. Ability to define network devices hierarchy using "parent" hosts, allowing detection of and distinction between network devices that are down and those that are unreachable.
  6. Notifications to contacts of email, pager, or user-defined method, when service or host status change.
  7. Ability to define event handlers to be run during service or host events for proactive problem resolution.
  8. Automatic log file rotation.
  9. Support for implementing redundant monitoring hosts.
  10. Optional web interface for viewing current network status, notification and problem history, log file, etc.
Related information:

Friday, September 22, 2006

Shell Scripts Monitoring Disk Space Utilization

Nothing special. Just a simple shell scripts, could be served as an introduction of Unix Shell scripts programming, written to check disk space utilization of Linux (applicable to Unix too) filesystems or partitions.

Note! Ignore the left most numeric digits which are not part of the Shell scripts coding. These are line number indicators, which could be turned on in Vi editor using the :set nu command code.

It might be useful to comment out line 14th and remove the hash key on line 15th, which disable echo alert to console and enable alerts emailed to mail box. Configure Linux scheduler via the crontab -e to run this shell scripts, perhaps once a day, and get system administrators alarmed of critical free disk space before the system comes to halt.

Related information:

Wednesday, September 13, 2006

Find And Remove Duplicate File

When the hard disk space going larger and larger, more files are storing into it. Over the time, there might be a lot of duplicate files scatter around the file system.

As bulk of these redundant files are here and there, redundant files mess up file system, decrease system performance, wasting valuable disk spaces, and ineffective file backup. It takes time and could be a really tedious job to find and delete these redundant files when low disk space alarmed!

MD5 checksum could be a good candidate to find duplicate and redundant files! It could be used to precisely identify which files have updated since last backup done by comparing the MD5 checksum of files between source and target of the backup.

MD5 short for Message-Digest algorithm 5, is a widely-used cryptographic hash function with a 128-bit hash value. MD5 has been employed in a wide variety of security applications used to check the integrity of data stream, TCP/IP packets, files, etc.
Related information:

  • MD5Sums is a tiny Windows command line freeware that able to automatically generate MD5 checksum for all files in a directory except sub directories. Technically, a Windows shell scripts such as VBScripts could be written to programmatic find duplicate files that reside in the file system by calling this tiny freeware via Run method of WshShell object.
  • MD5 unofficial homepage to find implementations in various programming languages.
  • MD5 shell scripts to find unique and redundant files in given directory
  • Search more related info with Google Search engine built-in

Tuesday, August 22, 2006

Bash Shell Scripts And Bad Interpreter

Beware! A Linux Bash shell scripts might fails to execute at all after uploaded from a different operating system. For example, from Windows OS to Redhat Linux.

Why? It is due to different encoding format implemented in different OS!

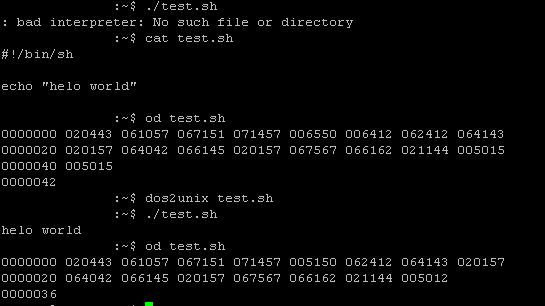
To confirm the shell scripts could run properly, always conduct testing upon finishing transfer. For example, duplicate a copy of the shell scripts transferred, remark all the lines of the shell scripts except the very first line where normally begin as #!/bin/sh (Sha-bang), append one simple line such as echo "test", then save and execute it. If the scripts fails to execute with error messages : Bad interpreter : no such file or directory, it might due to file encoding format!

Most commercial UNIX system default to Bourne shell /bin/sh (hence, called Bourne shell scripts) whereas Linux system default to Bash shell /bin/bash (hence, called Bash shell scripts). A symbolic link /bin/sh pointing to /bin/bash is usually created during Linux setup.

The first line of most UNIX shell scripts is #!/bin/sh. The two characters #!, known as sha-bang, tells the UNIX operating system that this file contains a set of commands to be fed to the command interpreter specified, which is /bin/sh.

This very first line #!/bin/sh can be omitted if only a set of generic system commands are used, or not using internal shell directives at all. Best practice is to include this line anyway.

If the UNIX shell scripts fails to execute with rejected error messages : Bad interpreter : no such file or directory,

Bad interpreter : no such file or directory

  1. Run command ls -la /bin/sh to confirm the specify path of command interpreter (the shell) is correct.

    In Linux system, it should be a soft link to /bin/bash. Verify that /bin/bash exists and create the soft link named /bin/sh if the link is not exists.

    Run the command ln -s /bin/bash /bin/sh to create a soft link (symbolic link) called /bin/sh pointing to the physical file /bin/bash.

    If the path is valid, then

  2. Make a copy of the scripts file.
    Next, run command dos2unix YoursScriptsFileName.
    Finally, execute chmod 755 YoursScriptsFileName.

    If this step works, it means the scripts file encoding format is not compliance to UNIX/Linux format. Chance is there if the file being transfer from other platform like Windows OS.

    Running command od YoursScriptsFileName and compare the first line of octal format of the file contents to the octal output of command od BackupScriptsFileName will tell the different.