Sunday, October 15, 2006

Linux Command To Confirm Bad Sector

Hard disk being one of the vital components in computer system. Unfortunately, hard disk is also being one of the most high risk and sensitive components that is prone to failures, owed to the fact of mechanical subsystem attached!

The Linux command badblocks could be used to run bad sector burn-in test on a new or suspected faulty hard disk. Just get a low end PC or server installed with Linux OS, attach the target hard disk to the IDE or SCSI bus, and run the badblocks command on the target hard disk. For example,

badblocks -svw -t random -p 3 /dev/sdb

get badblocks to perform three rounds of destructive write of random data to the second SCSI hard disk.

Be careful! The option switch -w performs destructive write. Never use this option switch on a partition with filesystem. Instead, use -n to perform non-destructive read-write on a partition with filesystem!

Related information:

  • Search more related info with Google Search engine built-in

Disable Linux Reboot On CTRL+ALT+DEL

Don't ever press CTRL+ALT+DEL key combination in a Linux server!

Windows guys used to press CTRL+ALT+DEL key combination follow by ENTER key to immediately lock the server running on Windows 2000 or Windows XP and above when they leave the server.

What is the default behaviour when pressing CTRL+ALT+DEL key combination in a Linux machine? Well, the default action of Linux in responding to CTRL+ALT+DEL key combination is to reboot the Linux machine immediately! Just press it once, not twice as in Windows Me, and Linux will not be kind to ask confirmation before it really rebooting itself!

Anyway, this Linux default behaviour in responding to CTRL+ALT+DEL key combination pressed could be tweaked, indeed. Edit the /etc/inittab system file, look for the line containing ctrlaltdel keyword, and then either

  1. Remark the line ca::ctrlaltdel:/sbin/shutdown -t3 -r now to disable Linux from responding to the CTRL+ALT+DEL key combination

               or

  2. Replace the /sbin/shutdown -t3 -r now with something else, such as

    dialog --clear --title "Information" --msgbox "Don't press CTRL+ALT+DEL key combination in Linux machine.\n\nTo reboot server, use init 6 or init 0 to shutdown Linux." 10 40;clear

    which use the dialog box command to alert users with a text-based GUI information dialog box.
Impress Linux users with text-based GUI dialog box control.

Related information:
  • The dialog box command is not a standard program installed by most Linux distribution. Find the dialog package from respective Linux distribution and install it.
  • Search more related info with Google Search engine built-in

Which Command Is Linux Refer

Opss! Executing ls command at keith login account displaying directories in blue color, executable file in green color, and plain text file in white color, etc.

But, when executing the same simple ls command at root login account does not differentiate file type by color scheme. How come?

Users who are familiar with shell built-in command alias will know that it is the alias that wrap the ls command with --color=none option switch. At the command prompt, type

alias | grep ls

will able to tell the fact of this.

The which command is used to find out which command the Linux shell interpreter is referring to in the current login session. The simple form of which command, such as which ls will show the path of the ls command without telling the alias name of it. Well, tweak which command with its command option switch and wrap it with alias command, such as this

alias which='alias | /usr/bin/which --tty-only --read-alias --show-dot --show-tilde'

Execute the which ls again, will now able to show both the ls command path and the alias of it, as shown in the diagram.

using the linux which command and alias command

Related information:

Thursday, October 12, 2006

Repair Corrupted Outlook PST OST File

PST, known as Microsoft Outlook personal folder file or email archive file, used to archive emails out from the mail box at server side to a local storage or network drive.

OST, known as Microsoft Outlook offline folder file, allows user to work with Microsoft Exchange mail box in an offline mode. For example, emails composed, Contacts or Calendar changes, etc, will be storing in the offline folder. These changes made in offline folder will be automatically synchronize with Microsoft Exchange Server once hook up to the network - emails composed will be sending out immediately and Contacts or Calendar changes are updated to server side objects.

Both the Microsoft Outlook PST and OST files are believed using MSDE database engine.

MSDE is a light-weight freeware version of Microsoft SQL Server database engine that Microsoft offers to attract database users (especially MS Access users, developers, students, educators, etc) to develop database projects using Microsoft SQL Server. The latest release of MSDE is called SQL Server Express edition.

MSDE built with limitation of accessing up to 2GB worth of data only. The same limitation occurs in MS Outlook PST and OST file as well!
Watch the size of PST and OST file! If they getting fatty, trim them down quickly to save archives of email from hitting the 2GB limitation or a file corruption will happened soon! The best practice is to create multiple PST or OST files to categorize email archives. For those email with attachment, it is easily reaching the 2GB limitation. So, more PST or OST files are needed to archive such emails with attachment!

Office 2000 and higher with latest patches installed is nice enough to alert users with an error message and disallow users from adding or receiving new email item, so to safeguard PST or OST file to become oversize and corrupted. Earlier versions of MS Outlook does not display any error or warning messages and allow users to oversize the PST or OST file until corruption!

Microsoft offers a tool called PST2GB to recover a MS Outlook PST file that is corrupted after storing over 2GB worth of data. Microsoft alleged that PST2GB is not a tool that is 100% work at all time! If PST2GB does work, it does not recover all of the data (the truncated data is missing).
PST2GB merely create a truncated copy of the PST file to under 2GB. The copy that is left after the PST2GB completes does not have all the original data because the PST2GB forcibly cuts a user defined amount of data (below 2GB) from the PST file.

In brief,
  1. Data or the emails archive after the truncation boundary will gone missing.
  2. There must be enough disk space, 2GB free disk space if as maximum as possible of recovery desired.
Steps to recover corrupted PST file as per Microsoft KB296088 (applied to MS Outlook 97 to MS Outlook 2002)

  1. Download the PST2GB from Microsoft Download Center

  2. Extract the downloaded file 2gb152.exe to an empty folder for these five files - Msstdfmt.dll, Msvbvm60.dll, Pst2gb.exe, Readme.rtf, Readme.txt

  3. Start the Pst2gb.exe program.

  4. Click Browse to select the oversize PST file and then click Open.

  5. Click Create, select the name and location of the truncated data file to be created, and then click Save.

  6. Enter the amount of the data that intended to truncate in the PST file. There is no absolute ideal figure for this but for the best results is using 20 to 25MB, more or less. If that works, repeat the process and truncate the original oversize PST file by only 15MB. If that works, then try the process with 5MB. If 25MB does not work, repeat the process and truncate the original PST by 35MB. If the process does not work, increase the amount until the process is successful.

  7. Run the Inbox Repair Tool scanpst.exe on the smaller PST file.

  8. Open the repaired PST file in Microsoft Outlook.

  9. (Recommended but optional) If the file opens, right-click the root folder of the PST, click Properties, and then click Compact Now to start the compression. For a file of this size, the compression may take approximately 4-8 hours.

  10. If the file does not open, discard the truncated PST file, and repeat the process with the original PST file. Truncate more data than in the first attempt, and try the process again.

If the following error message arise when trying to run the PST2GB Utility

Run-time Error '713': Class not Registered. You need the following file to be installed on your machine. MSSTDFMT.DLL

To resolve this error, follow these steps:
  1. Microsoft Windows 98, Microsoft Windows 98 SE, Microsoft Windows ME

    1. Copy the MSstdfmt.dll file to the C:\Windows\System folder.

    2. Open a command prompt, and then type the following command

      REGSVR32 C:\Windows\System\MSSTDFMT.DLL

  2. Microsoft Windows NT, Microsoft Windows 2000, and Microsoft Windows XP

    1. Copy the MSstdfmt.dll to the C:\<windir>\System32 folder.

    2. Open a command prompt and type the following command

      REGSVR32 C:\<windir>\System32\MSSTDFMT.DLL

      where <windir> is either the WINNT or the Windows directory.
Related information:

Wednesday, October 11, 2006

lsof Identify Resource Locked Process

Samba server comes with a handy utility called smbstatus to report users who are holding the shared resources.

Utilities used to find out processes that are locking system resources are among the most wanted system utilities for experienced users and system administrators. The lsof being one of such excellent utility that used to identify process or user that is locking system resource such as file or network socket.

For example, a system administrator could use the lsof -i to easily understand how the IBM MQ server communicate over the TCP/IP network with IBM Informix server. The lsof output, as in the diagram below, shows that the Informix oninit is listening to a user defined mnemonic port name stp which the IBM MQ server communicate with. The /etc/services system files is usually used to map a numeric port number to a descriptive port name defined by user.

The Linux lsof utility used to find out process or user that locks a system resource such as file or network socket

  1. Execute lsof -i TCP to report all processes that are accessing the TCP sockets found on the system

  2. Execute lsof -i tcp:8080 to find out what process is holding TCP port 8080.

  3. Execute lsof without any command options to list system wide resources that are using by processes running in the system.

  4. Execute lsof -p 456 to show all resources that are being held by process id 456

  5. Some programs might running on the Linux system by more than one instance. In this case, type lsof -c ProgramName instead of lsof -p PID to get a broader scope of view. For example, lsof -c squid to find out what are the resources held by all squid processes running on the system.

  6. Execute lsof -u keith to confirm resources that are being held by user id keith

  7. Execute lsof /home/keith/secretfile to find out what are the processes that are locking the specify file /home/keith/secretfile
Related information:
  • Another utility called fuser has similar features as of lsof utility. Executing fuser -m /media/cdrom will report all process id that are holding the specify resource.

    Each of the process id suffix with an ASCII character code which represent the resource access type. These resource access type codes are not standardize among various Linux distributions. To be safe and accurate, always consult the fuser man page to confirm the code definitions.

    To check out what process ID is using TCP port 8080, execute the fuser as fuser -n tcp 8080 or fuser 8080/tcp

  • The native network related Linux command netstat is a good tool to find out what program or command is binding to a TCP and UDP port. For example, there are Bind, Djbdns, etc, used to bind with port 53 for DNS protocol. By executing netstat command as

    netstat -tulap

    will shows both the program and process id that bind to the network port. The diagram below shows the commands output of lsof vs netstat.

    netstat vs lsof

    Both of the commands displaying pseudo port name instead of numeric port number, where the mapping of pseudo port name and numeric port number is defined in /etc/services file.

    The netstat command, however, able to display numeric port and IP address with -n option switch. For example, rewrite the command as netstat -tulapn

    Note! Both netstat -tulap and lsof -i MUST be executed with root user account privileges, else nothing as those in the diagram above will be seen.

  • Search more related info with Google Search engine built-in

Tuesday, October 10, 2006

MD5 Shell Scripts Find Duplicate Files

The shell scripts wrap the default md5sum program found on most Linux system to prepare a report of unique and duplicate files in a given directory.

The lengthy source code could be shorten if removing the DupUniRpt function which merely used to prepare an easy to read report that showing both the filename and number of duplicate and unique files.

By removing the DupUniRpt function call and function coding, do remember to add the line

cat $FM5L

right after the DupUniRpt function call in the if-else statement. The $FM5L is a semi-raw report file that groups duplicate and unique files together.

The wDupUniRpt.sh contain the same source code of DupUniRpt function source code, which could be used to prepare that easy to read report based on the semi-raw report file. This shell scripts created merely for easy debugging purpose.

Both these shell scripts have been tested successfully with as much as possible scenarios. The source code might be able to further enhanced for efficiency or bugs fixing if any. Any suggestive comments are greatly appreciated.

Related information:

  • wmd5.sh to report both filename and number of duplicate and unique files in a given directory
  • wDupUniRpt.sh used to report redundant and unique records in an ASCII file of sorted records.
  • MD5 checksum used to find redundant files
  • Search more related info with Google Search engine built-in

Monday, October 09, 2006

Using ls Command By Examples

The ls command is a Linux command that is used to list directory contents. In fact, it is a standard shell command that exists in all Unix/Linux variants.

Using ls command by examples

  • To list all files in ascending order of file name detailed with file modification time

    ls -la

  • To list all files in descending order of file creation time in full or customized date-time format

    ls -lact --full-time
    ls -lact --time-style="+%d %m %Y"

  • To list all files in descending order of file creation time

    ls -lact

  • To list all files in descending order of file size in kilobytes

    ls -laSh

  • To list only directories

    ls -ap | grep /
              or
    ls -al | grep ^d

    Alternatively, use the find command as

    find . -type d -print

  • To list only directories initial with rpt filename

    ls -al rpt* | grep :$
              or
    find . -type d -name "rpt*" -print

Definition of ls file listing command option switch
  • option switch l used to list files in long listing detailed format.

  • option switch a used to list all files including hidden files which filename prefix with a dot.

  • option switch lct used together to list file in descending order of file creation time.

    option switch lc list file creation time and sorted by filename.

    option switch lt list file in descending order of file modification time.

  • option switch h used to list files size information in kilobytes (KB).

  • option switch S used to list files in descending order of file size in byte.

  • option switch r used to reverse the default of descending listing order to ascending listing order.

  • option switch --full-time or --time-style used to display time-related info in full or customized format.


Notes! If the ls command colour scheme is not easy to read, turn it off by either:
  • On ad-hoc basis by adding option switch. For example

    ls /etc --color=none

    to list /etc directory contents without color scheme turning on. OR

  • On selective login session only. Use the alias command to save typing efforts. For example, execute the command

    alias ls="ls --color=none"

    will cause subsequent ls command executing as if it is supplied with --color=none option switch and automatically turn off the color scheme.

  • On each login session of individual login acount only. Copy the file /etc/DIR_COLORS to the user home directory as $HOME/.dir_colors and edit the variable COLOR to become COLOR=none to do the job.

    From the next user login onwards, type the command set | grep COLOR will notice that the COLORS variable changed as specified in the $HOME/.dir_colors setting file. Typing the ls command as usual which will disable the file listing color scheme automatically.

    To turn on the color scheme again, simply rewrite the line COLOR=none to COLOR=tty or COLOR=auto will do.

    The file /etc/DIR_COLORS is used to control file listing color scheme globally, meaning that all users account will be affected.
Related information:

Tuesday, October 03, 2006

File Command Guess Linux File Type

By convention, Windows system using 3 alphanumeric characters to serve as file extension. File extension telling Windows OS how to deal with the file, what program to manipulate the file, and to Windows users easily recognize a common file type.

There is no such strong concept of file extension in Linux as well as UNIX world. Linux folks, however, do practice to use file extension for some file formats such as compression or archive file format. Windows users might easily get cheated by file extension trap in Linux.

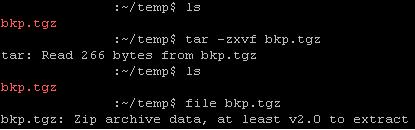
For example, it is perfectly fine to rename a PKZIP compatible zip file called backup.zip to backup.tgz or whatever filename. Later, if the user simply executing tar -zxvf backup.tgz might either get errors or see nothing and thought the file is corrupted.

Purposely rename a PKZIP compatible zip file as it is a gzip compressed tarball archive file. Use the file command to test the file if it is a valid Linux file format.

Wait! Before deleting the file which thought to be corrupted, use the file command to inspect the file type first.

Type file backup.tgz at the command prompt, it shows that backup.tgz is actually a PKZIP compatible zip file. So, user should executing unzip backup.tgz to extract the zip file or rename backup.tgz to backup.zip before executing the unzip command.

Related information:

  • Search more related info with Google Search engine built-in

Tuesday, September 26, 2006

Understand And Configure Linux Printer System

Starting Redhat 7.3, Redhat Linux support two type of printing system known. These two subsystem are known as LPRng and CUPS respectively.

  1. LPRng printing system, Redhat default printer subsystem, provides printconf as printer manager utility to configure /etc/printcap configuration file, printer spooler, etc.

    While at command prompt, executing printconf-tui (Redhat 7.3) or redhat-config-printer-tui (Redhat 8.0) to bring up command line version of LPRng printing manager.

    For the graphical version, click on the Main Menu => System Settings => Printing or type redhat-config-printer or printconf-gui at a XTerm or Gnome terminal shell prompt to bring up the same GUI program.

  2. CUPS, shorts for Common UNIX Printing System, is an Internet Printing Protocol-compliant system for UNIX and Linux. CUPS printer subsystem uses the printer manager utility called lpadmin to configure /etc/printcap configuration file, printer spooler, etc. If CUPS is not the default printer subsystem, launch the Printer System Switcher application by executing the command redhat-switch-printer and set CUPS as the new default printer subsystem.

    To allow only a few selected users to use a printer called inkjet-graphic, execute the command lpadmin -p inkjet-graphic -u allow:keith,jazz,alice and these setting will be updated to /etc/cups/printers.conf configuration file.
Note! The printer manager utility, printconf or lpadmin, saves any printer configurations made to the /etc/printcap setting file. If there is a need to make any printer configurations outside the printer manager utility, add them to the /etc/printcap.local file. The /etc/printcap file will be deleted whenever the printer manager executing or a server reboot.
Steps to add new printer is almost the same among printer manager utilities. In brief, these are the key points to get it works:
  1. Give a descriptive queue name to distinguish the new printer with other printers or network resources, such as keith_laser, boss_laser, tenfloor_inkjet, etc.
  2. Choose the appropriate printer queue type, such as LOCAL queue type for local physical attached printer, JETDIRECT for jetdirect printer, etc.
  3. If there is option to select the Printer Device, rescan the devices for the correct device, or create a custom device. This will be the /dev entry that represents the interface between the device driver and the printer itself. In most instances, the device will be named /dev/lp0.
  4. Choose a Printer Driver by selecting one from the extensive list. Drivers marked with an asterisk (*) are recommended drivers. If to configure remote printer or printer that does not have a corresponding driver in the list, the safest choice would be Postscript Printer. For JetDirect printers, Raw Print Queue is recommended.
To enable local printer sharing for remote host:
  1. In local host which the printer attached, edit the /etc/lpd.perms configuration file to add in one line that will read ACCEPT SERVICE=X REMOTEHOST=</etc/host.lpd and make sure it should added before the line containing REJECT SERVICE=X NOT SERVER.
  2. In the local host as well, edit the /etc/host.lpd printer access control file add in the full qualify DNS host name or IP address, one record per line, of hosts that are allowed to share the printer attached.
  3. At the remote host, add the network printer as adding local printer except one has to choose a Unix Printer queue type and type the print server hostname and port (usually 631).
Related information:
  1. LinuxPrinting.org is a database of documents about printing, along with a database of nearly 1000 printers compatible with Linux printing facilities.
  2. Linux printing how-to from the Linux Documentation Project.
  3. Search more related info with Google Search engine built-in

Monday, September 25, 2006

Internet Explorer Turns FTP Browser

FTP is a legacy file transfer protocol that has been widely used since the day of networked computing.

Other than using the serious typing of command line FTP client, such as the standard FTP client offers by all Windows system, Internet Explorer able to serve as GUI FTP browser too!

Follow these simple steps to turn IE into a graphical FTP client:

  1. Click the Tools menu from Internet Explorer,
  2. Click on Internet Options,
  3. Click the Advanced tab,
  4. Check the check box labeled as "Enable Folder View For FTP Sites",
  5. Check the check box labeled as "Use Passive FTP". Set this option only if the PC is behind a firewall.
  6. Click OK button to complete the setting.
  7. Now, IE is ready to serve as graphical FTP browser. For example, type ftp://keith@188.8.1.10 in the IE address bar and press ENTER to instruct IE connect to FTP server 188.8.1.10 using FTP user account keith. Enter the password when prompt.
  8. Click OK and wait. After successful authentication, an interface similar to Windows Explorer shown. Copy files or folders as usual!
Related information:
  • Search more related info with Google Search engine built-in

Thursday, September 14, 2006

7-Zip Better File Archiver Freeware

7-Zip is a full function file archiver freeware!

7-Zip default to compress files in .7z compression format using LZMA compression algorithm.

LZMA, shorts for Lempel-Ziv-Markov chain-Algorithm, is a data compression algorithm developed on 2001. It uses a dictionary compression scheme similar to LZ77 (such as Gnuzip - better known as gzip in Linux world) but features with
  • high compression ratio
  • variable dictionary size up to 4GB
  • compressing speed at about 1MB/s and decompressing speed at about 10-20MB/s on 2GHz CPU
  • little memory require for decompressing depends on dictionary size
  • small code size for decompressing at about 5KB
  • supporting multi-threading and Intel Pentium 4 HT technology
Besides supporting 7z compression format, 7-Zip too able to compress and decompress some other popular compression formats.
  • Supported compression file formats:
    7Z, ZIP, GZIP, BZIP2 and TAR
  • Unzip compressed file formats:
    7Z, ZIP, GZIP, BZIP2, TAR, RAR, CAB, ISO, ARJ, LZH, CHM, Z, CPIO, RPM, DEB, and NSIS
While the classic Winzip, WinRAR, PowerArchiver, etc discontinue as true freeware, 7-Zip becomes better alternative freeware of file archiver as it is distributed under the GNU LGPL, with exception for the RAR plugin.

Others attractive features of 7-Zip such as:
  • Supports files size up to 16000000000GB
  • Unicode file name
  • Self-extracting capability for 7z format
  • Integration with Windows Shell
  • Ability of using any compression, conversion or encryption method
  • Multilingual interface up to 63 languages at time of writing.
  • Available in various platforms such as both Windows 32-bit and 64-bit version, Unix, FreeBSD, Redhat, Fedore Core, Debian, Gentoo, Mac OS X, BeOS etc

Wednesday, September 13, 2006

Find And Remove Duplicate File

When the hard disk space going larger and larger, more files are storing into it. Over the time, there might be a lot of duplicate files scatter around the file system.

As bulk of these redundant files are here and there, redundant files mess up file system, decrease system performance, wasting valuable disk spaces, and ineffective file backup. It takes time and could be a really tedious job to find and delete these redundant files when low disk space alarmed!

MD5 checksum could be a good candidate to find duplicate and redundant files! It could be used to precisely identify which files have updated since last backup done by comparing the MD5 checksum of files between source and target of the backup.

MD5 short for Message-Digest algorithm 5, is a widely-used cryptographic hash function with a 128-bit hash value. MD5 has been employed in a wide variety of security applications used to check the integrity of data stream, TCP/IP packets, files, etc.
Related information:

  • MD5Sums is a tiny Windows command line freeware that able to automatically generate MD5 checksum for all files in a directory except sub directories. Technically, a Windows shell scripts such as VBScripts could be written to programmatic find duplicate files that reside in the file system by calling this tiny freeware via Run method of WshShell object.
  • MD5 unofficial homepage to find implementations in various programming languages.
  • MD5 shell scripts to find unique and redundant files in given directory
  • Search more related info with Google Search engine built-in

Tuesday, September 12, 2006

Unzip RAR With ExtractNow Freeware

ExtractNow is a great non-adware freeware used to decompress RAR compression file format!

As its name suggests, ExtractNow is merely an decompressing utility and is not a complete archival software. Nevertheless, this simple free utility is more than enough to satisfy today most decompressing functions. Other than supporting RAR compression file format, ExtractNow also support today majority compression file format such as ZIP, ISO, BIN, IMG, IMA, IMZ, 7Z, ACE, JAR, GZ, LZH, LHA, and SIT!

ExtractNow developer suggest not to bundle DLL that used to enable SIT compression file format support in its installer so as to reduce (installer) file size. Having say that, separate download of DLL is needed if expected to enable SIT support in ExtractNow.
Related information:
  • ExtractNow official site
  • Click here to separate download DLL to enable SIT file compression support
  • Search more related info with Google Search engine built-in

Sunday, September 10, 2006

Sharing Big File With File Splitter

Email a big file of few megabytes as attachment is never a good idea as it will likely to hang up the email server. Because of that, most email servers are likely configured to not relay or process email with non friendly attachment too. If it is really need to email such attachment,

  • Split the file into pieces of smaller size with file splitter such as File Chopper.
  • Compress the file to highest possible compression ratio and creating span disk (support by most zip utilities such as WinRar & Power Archiver)
  • Upload the file to public file server such as upload.com and rapidshare.de that offers file sharing services.
    CAUTION! It is better to zip the files with strong encryption before uploading to any public file sharing providers. Zip the files with encryption helps to reduce file size as well as protect sensitive data from the eyes of non expected readers!
  • Combination of the three method - split the file, compress it with password encryption, and host the split-compressed file to public file server.

    File splitter is preferable than span disk feature of zip utilities as file split could be rejoined with Windows built-in command whereas "span disk" require the receiving end to have similar zip program installed.
Related information:
  • File Chopper is a tiny file splitter program that able to chop a file into arbitrary file size and automatically generate a MS-DOS batch file used to rejoin the pieces of file back to its original file. The batch file is using Windows built in DOS copy command to do the job. For example, typing
    copy /b File.1 + File.2 WholeFile.exe
    to rejoin split files called File.1 and File.2 back to its original and workable file called WholeFile.exe
  • Uploading.com only allow unlimited download at certain countries or registered users only. Downloading speed is quite fast as at time of writing.
  • Rapidshare.de works similar to uploading.com
  • Using Lycos Mail account. The redesign of Lycos Mail upgraded to allow unlimited attachment size as claimed in its official site, provided not exceeding the default 3GB email storage space allocated to each email account. Although, the recipient's email system might not accepting such emails with huge attachment size. So, use Lycos Mail to send email with unlimited attachment size only to recipient's Lycos Mail email account! Perhaps, this is the Lycos Mail's intention to get more users to attach with Lycos Mail and not the others like Yahoo! Mail or Gmail!
  • Search more related info with Google Search engine built-in

Zero Fill Sure Delete Sensitive Data

Simply delete a file or format a hard disk by conventional way doesn't securely protect sensitive data stored inside the hard disk!

There are chances that other people able to recover or undelete the sensitive data by using simple undelete utilities such as Restoration.

However, there are utilities too that able to anti-undelete data deleted from hard disk! Anti-undelete utilities such as SDelete and Sure Delete will overwrite the sensitive data at least one time (or more than one times for more security in mind) with arbitrary bits or zero bits as Zero Fill does!

SDelete is a command line utility which is easy to use yet secure than Windows built-in del DOS command or Windows native delete function! To make it easy to use,

  1. Click on Start button,
  2. Click on Run menu,
  3. Type cmd in the Open field and click OK to call up Command Prompt window,
  4. Type echo %PATH% at the command prompt and press ENTER to output a list of default program paths separated with semi-colon.
    The default program path is used by Windows Run menu and Command Prompt to automatically locate a file or program. For example, the Run menu automatically locate cmd.exe and execute it, after typing cmd followed by pressing ENTER in previous step shown. If the cmd.exe is not reside in default program path, the Run menu will not able locate and execute it automatically.
  5. Put the Sdelete.exe to the any one of the folder path listed in echo %PATH% output, preferable is to use the system folder (e.g. C:\Windows\System32 in a default Windows XP setup),
  6. Add a MS-DOS Command Prompt shortcut with customized option switch to Context Menu (if the shortcut is not there).

    After this step, using command line utilities will becomes easier. Just right-click on any folder and click on the MS-DOS Command Prompt shortcut added to Context Menu, the MS-DOS Command Prompt will opens and automatically pointing to the complete folder path of which the folder being right-clicked. Now what? Just type sdelete SensitiveFile.dat to delete a file called SensitiveFile.dat resides in that particular folder - hassle free!
Related information:
  • SDelete command line utility used to delete sensitive data securely
  • Sure Delete Window GUI utility used to delete sensitive data securely
  • Create File is one of Windows 2000 Resource kit (creatfil.exe) used to generate empty file of arbitrary size up to 4GB (when running on Windows XP). Use it to create as many empty file as possible to fill up all the empty space reported by Windows will able to wipe off deleted file data that reside at these free disk space.
  • WipeFree command line utility used to generate dump file to fill up free disk space where the deleted file reside. It is better than creatfil.exe as it doesn't limited to 4GB file size. Although, its speed is lower than creatfil.exe does.
  • What happen to a file when deleted from Windows
  • Undelete files from an emptied Recycled Bin with Restoration
  • Enable MS-DOS faster change path and auto-complete filename
  • Search more related info with Google Search engine built-in

Thursday, September 07, 2006

Undelete File From Emptied Recycle Bin

Undelete file utilities able to unerase deleted files even the deleted files no longer in the Recycle Bin!

Thanks to Brian Kato's effort in creating a tiny but great utility which he called it Restoration. It is absolutely free, standalone (no installation required, simply double-click and run), freeware (non-adware), tiny, and a must have software in a USB thumb drive. Depending on the free disk space left on hard disk, those deleted files might able be undeleted by Restoration!

So, don't panic next time if the files being deleted accidentally and emptied from Recycle Bin. SHIFT+DEL or even formatting hard disk also not a problem with Restoration to recover the deleted files!


However, do mind to worry on how to prevent highly sensitive and confidential files from recovery by others!

Sunday, September 03, 2006

Vi Editor Quick Reference

Read this brief introduction of Vi editor cheat sheet for better understanding on the guides follow:

  1. Always use vim (VI Improved editor) instead of vi, as some of the features outlined below are found only with vim.

    Another great feature of vim is that, it will always open the file at the line where the cursor stop right before existing from the last file access!

    If it has been a habit with vi command name, then make an alias and put it into the login scripts

    alias vi='vim'

    to retain the simplicity of the command name. For the same reason (of simplicity), the vi command name is used to refer vim, throughout this Vi command cheat sheet!

  2. Bold font used to denote Vi editor's command code.

  3. To execute Vi command code, press ESC to enter command mode.

  4. On start up, Vi editor is in neutral mode. Press ESC follow by i to start editing (insert) mode.

  5. Once complete typing the command code, Vi editor automatically shift to editing mode. Some command codes which initial with ":" (colon), there is a need to press ENTER key to end the command code.

  6. If it is not comfortable with the Vi editor color scheme, turn them off by typing:

    • :syntax off - turn off color scheme
    • :set nohlsearch - turn off search pattern highlighting

  7. If Vi editor color scheme is a must, but found that some of the color (especially the color of comment lines) is dim and not bright enough for easy reading, tweak the Vi editor by

    • :set bg=dark
               or
    • :set bg=light

    to find the best Vi editor background color for a better colored visual aid and comfortable reading.

  8. Press V to mark the whole line under the cursor, continuous as cursor move. Press v to start highlight as cursor move.

  9. To get "online" help on any of the Vi editor command codes, press :help command code in the editor.
Bulk delete or copy then paste a block of sentences within a file
  1. Move the cursor to the first line of the block of sentences and press mm
  2. Move the cursor to the last line of the block of sentences
  3. Press d'm to delete the block of sentences from current line where the cursor stop to the line where "m" marker initiated in step 1, OR
  4. Press y'm to copy the block of sentences from current line where the cursor stop to the line where "m" marker initiated in step 1, THEN
  5. Move the cursor to a position of file where it is intended to paste the copied block of sentences
  6. Press p to paste the copied block of sentences.
Bulk copy a block of sentences in file A and paste the copied sentences to file B
  1. Move the cursor to the first line of the block of sentences and press mm
  2. Move the cursor to the last line of the block of sentences
  3. Press "by'm to copy the block of sentences from current line where the cursor stop to the line where "m" marker initiated in step 1
  4. Press :e fileB to open another file called fileB for editing

    • Use command code :!e fileB instead of :e fileB if there is a need to continue editing fileA after exiting fileB.

  5. Move the cursor to a position of file where it is intended to paste the copied block of sentences
  6. Press "bp to paste the copied block of sentences from fileA to fileB.

Copy portion of text in a line then paste to elsewhere within a file
  1. Move the cursor to the first character of the intended portion of text to be copied and press mm
  2. Move the cursor to the last character of the intended portion of text to be copied
  3. Press y`m to copy the portion of text from the first character where "m" marker initiated in step 1 to the last character where current cursor stop.
  4. Move the cursor to the intended position of the file
  5. Press p to paste the copied portion of text.
  • To copy portion of text from file A and paste the copied text to file B, use command code "by`m instead of y`m
  • Read carefully that y'm function differently from y`m as shown. They are different syntax, indeed!

Moving around within the file
  1. Press G to move the cursor to the last line of file
  2. Press 1G or gg to move the cursor to the first line of file
  3. Press nG to move the cursor to the n-th line of file
  4. Press CTRL+b to move the cursor backward in 1 full screen
  5. Press CTRL+f to move the cursor forward in 1 full screen
  6. Press 0 (numeric zero) to move the cursor to the beginning of line
  7. Press $ to move the cursor to the end of line
  8. Press h to move the cursor to the left or press CTRL+h while in editing / inserting mode
  9. Press j to move the cursor down or press CTRL+j while in editing / inserting mode
  10. Press k to move the cursor up or press CTRL+k while in editing / inserting mode
  11. Press l to move the cursor up or press CTRL+l while in editing / inserting mode
  • Use the arrow key of the keyboard to move up, down, right, or left if it works in your terminal.

Check the current position or line number of the file edited currently
  1. Press :set nu to turn on display line numbering feature
  2. Press :set nonu to turn off line numbering feature
  3. Press CTRL+G to show current file name, current line number, total lines, and percentage of cursor location in the file.

Search a keyword within the file
  1. Press :set ignorecase to search in case insensitive mode
  2. Press :set hlsearch to turn on feature of highlighting matched search term
  3. Place the cursor under the search term exists in the file. Then press * (asterisk) to instruct Vi editor to search for next occurrence of this search term in forward position.
  4. Press /apple to search for "apple" keyword in forward position.
  5. Press ?apple to search for "apple" keyword in backward position.
  6. To search for "Apple" or "apple", apply the regular expression by typing command code /[Aa]pple or ?[Aa]pple
  • While in searching mode, press N to instruct Vi editor to search in backward position. Press n to instruct Vi editor to search in forward position again.

Replace matched search keyword with new word
  1. Press :s/Color/Colour/gic to replace "Color" with "Colour" in the current line by ignoring case sensitive and ask for confirmation before replacing.

    • the g flag indicate to replace all occurrence of the pattern found within the line
    • the i flag indicate case insensitive
    • the c flag indicate to ask for confirmation before replacing.

  2. Press & while in next line to tell Vi editor repeating the last used :s command (substitution)
  3. Press :1,$s/apple/orange/g or :%s/apple/orange/g to instruct Vi editor to replace all apple found in file to orange
  4. Replace "apple" with "^" in the previous example to tell the Vi editor to insert orange in every beginning of lines in the file.

Blogger Digest :: Notes of regular expression
  1. The . means any single character except newline
  2. The * means zero or more occurrences of any character
  3. The [] means any single character specified inside the bracket
  4. The [^] means any single character not specified inside the bracket
  5. The \< means match at the beginning of the word
  6. The \> means match at the end of the word
  7. The \<ABC\> means match the word "ABC" exactly (and not "deABCfg")
  8. The ^ means match at the beginning of the line
  9. The $ means match at the end of the line
  10. The ^ABC$ means to search for ABC within the line.

Common editing functions
  1. Press A to indicate start of appending at the end of line
  2. Press a to indicate start of appending after the cursor
  3. Press I to indicate start of inserting at the end of line
  4. Press i to indicate start of inserting after the cursor
  5. Press O to insert one blank line before the current line
  6. Press o to insert one blank line after the current line
  7. Press J to join the next line into the end of the current line
  8. Press 3,5J to join the lines of 3rd to 5th into the end of the current line
  9. Press R to indicate start of replacing characters continuously from the current cursor until the start of next command mode (by pressing ESC key)
  10. Press r to replace one single character
  11. Press ~ to toggle character to uppercase or lowercase
  12. Press u to undo one at a time the series of changes made in backward sequence
  13. Press U to undo the latest change made
  14. Press CTRL+R to redo changes made by undo
  15. Press x to delete character to the right of the cursor
  16. Press X to delete character to the left of the cursor
  17. Press dd to delete the whole line where the cursor rest
  18. Press ndd to delete n lines from the line where the cursor rest
  19. Press d$ or D to delete all characters from the cursor to the end of line.
  20. Press N,Md to delete all lines from line N to line M, inclusively.
  21. Press :! top to execute a shell command called "top" (in this example), and return to the edited file when existing from "top" command.
  22. Press : top to execute a shell command called "top" (in this example), and exit to the shell command prompt when existing from "top" command.
  23. Press :!! to repeat the latest executed shell command inside the vi editor
  24. Press CTRL+l to refresh the editing screen
  25. Place the cursor under a filename that exists in the currently edit file, say "stdio.h" that exists in a typical C program source code, then press gf to instruct the Vi editor search (start from the current directory - hence priority of file returned is from current directory) and open the file named "stdio.h"
  26. Place the cursor under a word which is likely part of the Linux man pages, for example "if", then press K will instruct the Vi editor to look for man page of "if" keyword. If there is, the man page is opened right from the Vi editor.
  27. Press :split to split horizontally the currently edited file into two Vi editor windows.
  28. Press :split file2 to split the Vi editor windows horizontally. The upper Vi editor windows access to file2 while the bottom Vi editor windows access to the currently edited file.
  29. While in splitting mode, press CTRL+WW to switch between split Vi editor window. Copy between files made even easier in split Vi editor windows - just copy the block of lines and press CTRL+WW switching to target file then press p to paste the copied lines.

Customize Vi editor environment
  1. Press :set all to print all current VI setting to screen
  2. Press :set nooption to turn off option (e.g. :set nonu to turn off line number printing)
  3. Press :set tabstop=2 to specify each tab equal to 2 spaces
  4. Press :set autoindent to tell Vi perform auto-indention as per previous indented line in the file
  5. Press :set noautoindent to turn off auto-indention
  6. Press :set nu to turn on line number display.
  7. Press :set nohls or :set nohlsearch to turn off feature of highlighting matched search term.
  8. Press :set hls or :set hlsearch to turn on feature of highlighting matched search term.
  9. Press :syntax enable or :syntax on or :syn on to turn on Vi syntax color scheme
  10. Press :syntax off or :syn off to turn off Vi syntax color scheme
  11. If it is very attractive to use Vi editor color scheme, but found that some of the color is dim and not bright enough for easy reading (especially the comment lines), tweak the Vi editor background color and "lighting" by

    • :set bg=dark
               or
      :set bg=light

    • :colorscheme blue
               or
      :colorscheme murphy (best colored aid)
               or
      Find out what others background color schemes are available by looking at the /usr/share/vim/vim61/colors directory. Find the colors directory from the file system if it is installed at different path, by typing

      find / -type d -name colors

      The colors directory contains *.vim file such as blue.vim, murphy.vim, peachpuff.vim, shine.vim, etc.
Note! The Vi editor environment setting could either

  • Place at the bottom of the file content and remarked as comments by the comment identifier. The comment identifier used is depend on the file type. For example, typical C program source code use /* while shell scripts use # as comment identifier. This method is meant to customize Vi editor environment based on file basis rather than apply globally to all files open in Vi editor.

    When the file opened in Vi editor, Vi editor will start to interpret the Vi editor environment setup and respond accordingly. Press :set modeline command code if Vi editor is not responding to the setup automatically.

    • The customization lines seen in a C program source code:

      /* vim: set autoindent: */
      /* vim: set tabstop=2: */

    • The customization lines seen in a typical shell scripts:

      # vim: set autoindent:
      # vim: set tabstop=2:

  • Create a file called ".vimrc" in home directory. This file will be read by VI editor to customize Vi editor environment for all files opened by Vi editor in the current login session as long as there is no customization embedded in the edited file.

    The $HOME/.vimrc file contains one customization setting per line. Hence the $HOME/.vimrc could be seen as

    • set autoindent
      set tabstop=2
      set nu
      set nohls
      syn off

General options to startup VI editor
  1. Type vi + filename to direct Vi editor open the file at the last line of file
  2. Type vi +n filename to direct Vi editor open the file at the n-th line of file
  3. Type vi -r filename to direct Vi editor to edit the last saved version of the file after crash
  4. Type vi -d f1 f2 to open f1 and f2 in Vi editor windows that split vertically. Then, press :diffupdate to highlight the differences found in f1 and f2. Press :set scrollbind will direct Vi editor to automatically refresh and highlight the differences found between f1 and f2. The :set scrollbind is particular useful when one of the files is editing and Vi automatically highlights the latest differences found between these 2 files.

General options to exit VI editor
  1. Press ZZ or :wq or :x to save and exit the edited file
  2. Press :w to save current file without exiting from the edited file.
  3. Press :w f2 to save the edited file to another file named f2 and continue editing the current file. If no save command given to the currently editing file, no changes made will be saved to this current file!
  4. Press :q! to quit the edited file without saving the changes made

Related information:
  • Search more related info with Google Search engine built-in