Sunday, October 15, 2006

Disable Linux Reboot On CTRL+ALT+DEL

Don't ever press CTRL+ALT+DEL key combination in a Linux server!

Windows guys used to press CTRL+ALT+DEL key combination follow by ENTER key to immediately lock the server running on Windows 2000 or Windows XP and above when they leave the server.

What is the default behaviour when pressing CTRL+ALT+DEL key combination in a Linux machine? Well, the default action of Linux in responding to CTRL+ALT+DEL key combination is to reboot the Linux machine immediately! Just press it once, not twice as in Windows Me, and Linux will not be kind to ask confirmation before it really rebooting itself!

Anyway, this Linux default behaviour in responding to CTRL+ALT+DEL key combination pressed could be tweaked, indeed. Edit the /etc/inittab system file, look for the line containing ctrlaltdel keyword, and then either

  1. Remark the line ca::ctrlaltdel:/sbin/shutdown -t3 -r now to disable Linux from responding to the CTRL+ALT+DEL key combination

               or

  2. Replace the /sbin/shutdown -t3 -r now with something else, such as

    dialog --clear --title "Information" --msgbox "Don't press CTRL+ALT+DEL key combination in Linux machine.\n\nTo reboot server, use init 6 or init 0 to shutdown Linux." 10 40;clear

    which use the dialog box command to alert users with a text-based GUI information dialog box.
Impress Linux users with text-based GUI dialog box control.

Related information:
  • The dialog box command is not a standard program installed by most Linux distribution. Find the dialog package from respective Linux distribution and install it.
  • Search more related info with Google Search engine built-in

Thursday, October 12, 2006

Repair Corrupted Outlook PST OST File

PST, known as Microsoft Outlook personal folder file or email archive file, used to archive emails out from the mail box at server side to a local storage or network drive.

OST, known as Microsoft Outlook offline folder file, allows user to work with Microsoft Exchange mail box in an offline mode. For example, emails composed, Contacts or Calendar changes, etc, will be storing in the offline folder. These changes made in offline folder will be automatically synchronize with Microsoft Exchange Server once hook up to the network - emails composed will be sending out immediately and Contacts or Calendar changes are updated to server side objects.

Both the Microsoft Outlook PST and OST files are believed using MSDE database engine.

MSDE is a light-weight freeware version of Microsoft SQL Server database engine that Microsoft offers to attract database users (especially MS Access users, developers, students, educators, etc) to develop database projects using Microsoft SQL Server. The latest release of MSDE is called SQL Server Express edition.

MSDE built with limitation of accessing up to 2GB worth of data only. The same limitation occurs in MS Outlook PST and OST file as well!
Watch the size of PST and OST file! If they getting fatty, trim them down quickly to save archives of email from hitting the 2GB limitation or a file corruption will happened soon! The best practice is to create multiple PST or OST files to categorize email archives. For those email with attachment, it is easily reaching the 2GB limitation. So, more PST or OST files are needed to archive such emails with attachment!

Office 2000 and higher with latest patches installed is nice enough to alert users with an error message and disallow users from adding or receiving new email item, so to safeguard PST or OST file to become oversize and corrupted. Earlier versions of MS Outlook does not display any error or warning messages and allow users to oversize the PST or OST file until corruption!

Microsoft offers a tool called PST2GB to recover a MS Outlook PST file that is corrupted after storing over 2GB worth of data. Microsoft alleged that PST2GB is not a tool that is 100% work at all time! If PST2GB does work, it does not recover all of the data (the truncated data is missing).
PST2GB merely create a truncated copy of the PST file to under 2GB. The copy that is left after the PST2GB completes does not have all the original data because the PST2GB forcibly cuts a user defined amount of data (below 2GB) from the PST file.

In brief,
  1. Data or the emails archive after the truncation boundary will gone missing.
  2. There must be enough disk space, 2GB free disk space if as maximum as possible of recovery desired.
Steps to recover corrupted PST file as per Microsoft KB296088 (applied to MS Outlook 97 to MS Outlook 2002)

  1. Download the PST2GB from Microsoft Download Center

  2. Extract the downloaded file 2gb152.exe to an empty folder for these five files - Msstdfmt.dll, Msvbvm60.dll, Pst2gb.exe, Readme.rtf, Readme.txt

  3. Start the Pst2gb.exe program.

  4. Click Browse to select the oversize PST file and then click Open.

  5. Click Create, select the name and location of the truncated data file to be created, and then click Save.

  6. Enter the amount of the data that intended to truncate in the PST file. There is no absolute ideal figure for this but for the best results is using 20 to 25MB, more or less. If that works, repeat the process and truncate the original oversize PST file by only 15MB. If that works, then try the process with 5MB. If 25MB does not work, repeat the process and truncate the original PST by 35MB. If the process does not work, increase the amount until the process is successful.

  7. Run the Inbox Repair Tool scanpst.exe on the smaller PST file.

  8. Open the repaired PST file in Microsoft Outlook.

  9. (Recommended but optional) If the file opens, right-click the root folder of the PST, click Properties, and then click Compact Now to start the compression. For a file of this size, the compression may take approximately 4-8 hours.

  10. If the file does not open, discard the truncated PST file, and repeat the process with the original PST file. Truncate more data than in the first attempt, and try the process again.

If the following error message arise when trying to run the PST2GB Utility

Run-time Error '713': Class not Registered. You need the following file to be installed on your machine. MSSTDFMT.DLL

To resolve this error, follow these steps:
  1. Microsoft Windows 98, Microsoft Windows 98 SE, Microsoft Windows ME

    1. Copy the MSstdfmt.dll file to the C:\Windows\System folder.

    2. Open a command prompt, and then type the following command

      REGSVR32 C:\Windows\System\MSSTDFMT.DLL

  2. Microsoft Windows NT, Microsoft Windows 2000, and Microsoft Windows XP

    1. Copy the MSstdfmt.dll to the C:\<windir>\System32 folder.

    2. Open a command prompt and type the following command

      REGSVR32 C:\<windir>\System32\MSSTDFMT.DLL

      where <windir> is either the WINNT or the Windows directory.
Related information:

Wednesday, October 11, 2006

lsof Identify Resource Locked Process

Samba server comes with a handy utility called smbstatus to report users who are holding the shared resources.

Utilities used to find out processes that are locking system resources are among the most wanted system utilities for experienced users and system administrators. The lsof being one of such excellent utility that used to identify process or user that is locking system resource such as file or network socket.

For example, a system administrator could use the lsof -i to easily understand how the IBM MQ server communicate over the TCP/IP network with IBM Informix server. The lsof output, as in the diagram below, shows that the Informix oninit is listening to a user defined mnemonic port name stp which the IBM MQ server communicate with. The /etc/services system files is usually used to map a numeric port number to a descriptive port name defined by user.

The Linux lsof utility used to find out process or user that locks a system resource such as file or network socket

  1. Execute lsof -i TCP to report all processes that are accessing the TCP sockets found on the system

  2. Execute lsof -i tcp:8080 to find out what process is holding TCP port 8080.

  3. Execute lsof without any command options to list system wide resources that are using by processes running in the system.

  4. Execute lsof -p 456 to show all resources that are being held by process id 456

  5. Some programs might running on the Linux system by more than one instance. In this case, type lsof -c ProgramName instead of lsof -p PID to get a broader scope of view. For example, lsof -c squid to find out what are the resources held by all squid processes running on the system.

  6. Execute lsof -u keith to confirm resources that are being held by user id keith

  7. Execute lsof /home/keith/secretfile to find out what are the processes that are locking the specify file /home/keith/secretfile
Related information:
  • Another utility called fuser has similar features as of lsof utility. Executing fuser -m /media/cdrom will report all process id that are holding the specify resource.

    Each of the process id suffix with an ASCII character code which represent the resource access type. These resource access type codes are not standardize among various Linux distributions. To be safe and accurate, always consult the fuser man page to confirm the code definitions.

    To check out what process ID is using TCP port 8080, execute the fuser as fuser -n tcp 8080 or fuser 8080/tcp

  • The native network related Linux command netstat is a good tool to find out what program or command is binding to a TCP and UDP port. For example, there are Bind, Djbdns, etc, used to bind with port 53 for DNS protocol. By executing netstat command as

    netstat -tulap

    will shows both the program and process id that bind to the network port. The diagram below shows the commands output of lsof vs netstat.

    netstat vs lsof

    Both of the commands displaying pseudo port name instead of numeric port number, where the mapping of pseudo port name and numeric port number is defined in /etc/services file.

    The netstat command, however, able to display numeric port and IP address with -n option switch. For example, rewrite the command as netstat -tulapn

    Note! Both netstat -tulap and lsof -i MUST be executed with root user account privileges, else nothing as those in the diagram above will be seen.

  • Search more related info with Google Search engine built-in

Tuesday, October 03, 2006

File Command Guess Linux File Type

By convention, Windows system using 3 alphanumeric characters to serve as file extension. File extension telling Windows OS how to deal with the file, what program to manipulate the file, and to Windows users easily recognize a common file type.

There is no such strong concept of file extension in Linux as well as UNIX world. Linux folks, however, do practice to use file extension for some file formats such as compression or archive file format. Windows users might easily get cheated by file extension trap in Linux.

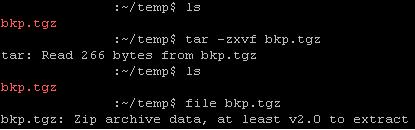
For example, it is perfectly fine to rename a PKZIP compatible zip file called backup.zip to backup.tgz or whatever filename. Later, if the user simply executing tar -zxvf backup.tgz might either get errors or see nothing and thought the file is corrupted.

Purposely rename a PKZIP compatible zip file as it is a gzip compressed tarball archive file. Use the file command to test the file if it is a valid Linux file format.

Wait! Before deleting the file which thought to be corrupted, use the file command to inspect the file type first.

Type file backup.tgz at the command prompt, it shows that backup.tgz is actually a PKZIP compatible zip file. So, user should executing unzip backup.tgz to extract the zip file or rename backup.tgz to backup.zip before executing the unzip command.

Related information:

  • Search more related info with Google Search engine built-in

Monday, September 25, 2006

Redhat Enterprise Linux System File Permission

Redhat Enterprise Linux device file permission could not be changed simply by using the chmod command. Instead, the device file permission is set by udev hotplug subsystem which is included in almost every 2.6 kernel based Linux distribution that is shipping.

The configuration file /etc/udev/permissions.d/50-udev.permissions defines the permission of each devices present in the Linux system. For example,

  • To change the raw devices file permission, search for the line that read as raw/*:root:disk:0660
  • To change tape drive file permission, search for the line that read as st*:root:disk:0660
The default permission defined is 0660. Simply change the 4 digits code as usual to an expected permission, say 0666 instead of 0660.

Related information:
  • Search more related info with Google Search engine built-in

System And Network Monitoring Freeware

Nagios is the answer!

Nagios is the a GNU GPL software that could used to monitor diverse servers and networking devices. Although the Nagios server running only in Linux and UNIX variants there are Windows based Nagios client that could used to monitor Windows server as well.
It is licensed under the terms of the GNU General Public License Version 2 as published by the Free Software Foundation.

Nagios is a powerful system and network monitoring application. It monitors hosts and services specified, alerting administrators when threshold triggered, and when they recover to healthy state.

Nagios is only available in Linux or UNIX variants. Although, it could helps to monitor Windows servers as well via the Windows version of Nagios client.

Nagios features:

  1. Monitors network services such as SMTP, POP3, HTTP, NNTP, PING, etc.
  2. Monitors server resources such as processor load, disk usage, etc.
  3. Simple plugin design that allows users to easily customize own service checks.
  4. Parallelized service checks.
  5. Ability to define network devices hierarchy using "parent" hosts, allowing detection of and distinction between network devices that are down and those that are unreachable.
  6. Notifications to contacts of email, pager, or user-defined method, when service or host status change.
  7. Ability to define event handlers to be run during service or host events for proactive problem resolution.
  8. Automatic log file rotation.
  9. Support for implementing redundant monitoring hosts.
  10. Optional web interface for viewing current network status, notification and problem history, log file, etc.
Related information:

Wednesday, September 13, 2006

Find And Remove Duplicate File

When the hard disk space going larger and larger, more files are storing into it. Over the time, there might be a lot of duplicate files scatter around the file system.

As bulk of these redundant files are here and there, redundant files mess up file system, decrease system performance, wasting valuable disk spaces, and ineffective file backup. It takes time and could be a really tedious job to find and delete these redundant files when low disk space alarmed!

MD5 checksum could be a good candidate to find duplicate and redundant files! It could be used to precisely identify which files have updated since last backup done by comparing the MD5 checksum of files between source and target of the backup.

MD5 short for Message-Digest algorithm 5, is a widely-used cryptographic hash function with a 128-bit hash value. MD5 has been employed in a wide variety of security applications used to check the integrity of data stream, TCP/IP packets, files, etc.
Related information:

  • MD5Sums is a tiny Windows command line freeware that able to automatically generate MD5 checksum for all files in a directory except sub directories. Technically, a Windows shell scripts such as VBScripts could be written to programmatic find duplicate files that reside in the file system by calling this tiny freeware via Run method of WshShell object.
  • MD5 unofficial homepage to find implementations in various programming languages.
  • MD5 shell scripts to find unique and redundant files in given directory
  • Search more related info with Google Search engine built-in

Sunday, September 10, 2006

What Happen When Deleting A File

What happen to a file when deleting it from Windows? The native Windows OS delete function simply remove the file entry (complete path and filename) from directory entries. The file's data content, however, is still remain untouched in the storage area. That is why to copy a file of few hundred megabytes take some minutes while deleting it takes just few seconds.

Disk formatting isn't different. Unless low level format or Zero Fill is performed, an advanced undelete utilities able to recover data from a hard drive formatted with high level or native disk format utilities. With low level format, the entire hard disk is then filled with "zero", hence overwrite any data reside in the hard disk!

Note, it is better to use low format utilities from the respective hard disk manufacturer instead of generic low formatter (such as the BIOS built-in function) to avoid the hard disk unusable later!
Related information:
  • How to undelete a file from Windows
  • How to delete a sensitive file securely
  • SDelete command line utility used to delete sensitive data securely
  • Sure Delete Window GUI utility used to delete sensitive data securely
  • Create File - Windows 2000 Resource kit used to generate empty file of arbitrary size up to 4GB (when running on Windows XP)
  • WipeFree command line utility used to generate dump file to fill up free disk space where the deleted file reside
  • Search more related info with Google Search engine built-in

Zero Fill Sure Delete Sensitive Data

Simply delete a file or format a hard disk by conventional way doesn't securely protect sensitive data stored inside the hard disk!

There are chances that other people able to recover or undelete the sensitive data by using simple undelete utilities such as Restoration.

However, there are utilities too that able to anti-undelete data deleted from hard disk! Anti-undelete utilities such as SDelete and Sure Delete will overwrite the sensitive data at least one time (or more than one times for more security in mind) with arbitrary bits or zero bits as Zero Fill does!

SDelete is a command line utility which is easy to use yet secure than Windows built-in del DOS command or Windows native delete function! To make it easy to use,

  1. Click on Start button,
  2. Click on Run menu,
  3. Type cmd in the Open field and click OK to call up Command Prompt window,
  4. Type echo %PATH% at the command prompt and press ENTER to output a list of default program paths separated with semi-colon.
    The default program path is used by Windows Run menu and Command Prompt to automatically locate a file or program. For example, the Run menu automatically locate cmd.exe and execute it, after typing cmd followed by pressing ENTER in previous step shown. If the cmd.exe is not reside in default program path, the Run menu will not able locate and execute it automatically.
  5. Put the Sdelete.exe to the any one of the folder path listed in echo %PATH% output, preferable is to use the system folder (e.g. C:\Windows\System32 in a default Windows XP setup),
  6. Add a MS-DOS Command Prompt shortcut with customized option switch to Context Menu (if the shortcut is not there).

    After this step, using command line utilities will becomes easier. Just right-click on any folder and click on the MS-DOS Command Prompt shortcut added to Context Menu, the MS-DOS Command Prompt will opens and automatically pointing to the complete folder path of which the folder being right-clicked. Now what? Just type sdelete SensitiveFile.dat to delete a file called SensitiveFile.dat resides in that particular folder - hassle free!
Related information:
  • SDelete command line utility used to delete sensitive data securely
  • Sure Delete Window GUI utility used to delete sensitive data securely
  • Create File is one of Windows 2000 Resource kit (creatfil.exe) used to generate empty file of arbitrary size up to 4GB (when running on Windows XP). Use it to create as many empty file as possible to fill up all the empty space reported by Windows will able to wipe off deleted file data that reside at these free disk space.
  • WipeFree command line utility used to generate dump file to fill up free disk space where the deleted file reside. It is better than creatfil.exe as it doesn't limited to 4GB file size. Although, its speed is lower than creatfil.exe does.
  • What happen to a file when deleted from Windows
  • Undelete files from an emptied Recycled Bin with Restoration
  • Enable MS-DOS faster change path and auto-complete filename
  • Search more related info with Google Search engine built-in

Thursday, September 07, 2006

Undelete File From Emptied Recycle Bin

Undelete file utilities able to unerase deleted files even the deleted files no longer in the Recycle Bin!

Thanks to Brian Kato's effort in creating a tiny but great utility which he called it Restoration. It is absolutely free, standalone (no installation required, simply double-click and run), freeware (non-adware), tiny, and a must have software in a USB thumb drive. Depending on the free disk space left on hard disk, those deleted files might able be undeleted by Restoration!

So, don't panic next time if the files being deleted accidentally and emptied from Recycle Bin. SHIFT+DEL or even formatting hard disk also not a problem with Restoration to recover the deleted files!


However, do mind to worry on how to prevent highly sensitive and confidential files from recovery by others!